Stardust Galaxy Warriors – PC Games | Full Version
Stardust Galaxy Warriors – PC Games | Full Version – Downloads Free PC Game


Stardust Galaxy Warriors is an engaging couch co-op action game, combining gameplay from shmups and brawlers mixed with light RPG elements. Choose from different game modes, gameplay settings, mechs, weapons and upgrades to customize the experience freely. Soar through space, defeat evil and save the future… from itself!
THE YEAR 2087 NEEDS US
You are the new police force of the galaxy, restoring peace and order to the whole universe. Up to four-player adventures await! Jump in your Galaxy Gear and become the space warrior that saves the future. It is now or never.
CREATE THE RULES
Go with the default ones, or tune the gameplay settings to your liking. Adjust health and shield amounts, fire rates, drop rates, hitbox sizes or turn on friendly fire for example. Choose the way you play from relaxed star rides to maddening bullet-hells!
FOUR MECHS OF JUSTICE
Choose from four different mechs each coming with its own special abilities.
Blue Falcon, the Sniper uses spears and missile barrages to kill his opposition from afar.
Red Tiger, the Berserker goes hog wild with frenzied claw attacks and time altering abilities.
Silver Wolf, the Dasher charges from place to place exploding enemies into pieces with his bombs.
Black Bear, the Reflector uses shields to make her allies invulnerable and her enemies die to their own bullets.
A SPRAWLING GALAXY
Blast evil left and right. The campaign game mode takes you to a perilous journey through space. From the depths of oceans, through alien hives and haunted factories to the outer limits of hyperspace. Explore the galaxy and its beautiful space scenery while destroying the evil.
GALACTIC WEAPON ARSENAL
Equip yourself with a combination of primary and secondary weapons, ranging from pulse rifles, chain guns and rail guns to rockets, shotguns and space flamethrowers! Up to 49 unique weapon combinations in addition to different upgrades and power-ups help you on the way.
GREETINGS FROM THE 90’s
Synth samples of yesterday are your allies in the struggle for tomorrow. Hypermelodic soundtrack is here to match your galactic operations!
 Tags:- Stardust Galaxy Warriors Syndicate Gold Edition Preload, Stardust Galaxy Warriors Syndicate Gold Edition Preload torrent, Stardust Galaxy Warriors Syndicate Gold Edition Preload download, Stardust Galaxy Warriors Syndicate Gold Edition Preload uplay, Stardust Galaxy Warriors Syndicate Gold Edition, Stardust Galaxy Warriors Syndicate Gold Edition torrent, Stardust Galaxy Warriors Syndicate Gold Edition crack, Stardust Galaxy Warriors Syndicate Gold Edition preload, Stardust Galaxy Warriors Syndicate Gold Edition preload torrent, Stardust Galaxy Warriors Syndicate Gold Edition uplay preload, Stardust Galaxy Warriors Syndicate Gold Edition unlocker, Stardust Galaxy Warriors Syndicate Gold Edition crack only,


MINIMUM:
- OS: Windows XP
- Memory: 2 GB RAM
- Graphics: 512Mb NVIDIA GeForce 9800 / ATI Radeon HD 2600 XT or greater
- DirectX: Version 9.0c
- Hard Drive: 1 GB available space
- Sound Card: DirectX compatible sound card
- Additional Notes: Game controller or 3-button mouse and keyboard
RECOMMENDED:z
- OS: Windows 7 or newer
- Processor: 2.8GHz+ Quad Core
- Memory: 4 GB RAM
- Graphics: 512Mb NVIDIA GeForce 440 / AMD Radeon 5670 or greater
- DirectX: Version 11
- Hard Drive: 1 GB available space
- Sound Card: DirectX compatible sound card
- Additional Notes: Game controller or 3-button mouse and keyboard


| Click On any link n Wait 5 seconds then Skip Ads | ||
| Download Torrent Client | U torrent | |
| Download Server 1 | Download Torrent | |
| Download Server 2 | Download Torrent | |
Sonic Lost World – PC Games | Full Version
Sonic Lost World – PC Games | Full Version – Downloads Free PC Game


In his latest plot to defeat Sonic and rule the world, Dr. Eggman has harnessed the power of menacing creatures known as the Deadly Six. However, when the Deadly Six rise up against their new master, Sonic must unite with his arch nemesis Eggman and explore the mystical Lost Hex in order to take them on head-to-head. Use Sonic’s amazing new moves & incredible Colour Powers to speed across a variety of unique terrains, racing inside, outside & upside down in every level.
NEW MOVES
Sonic moves like never before. Vault over obstacles, free run up & along walls & sky dive between islands at lightning speed. Plus the Spin Dash is back!
COLOUR POWERS
New & improved Colour Powers. Sonic can now fly through the air, tear up levels & explode into enemies. He’s more powerful than ever!
NEW WORLD
Speed through a variety of exhilarating levels. Explore massive mind-bending courses, vast underground tunnels & colossal structures in the sky as you run inside, outside & upside down.
BOSS BATTLES
Save the world one fight at a time. Take on each of the devious Deadly Six in dynamic boss battles which test all of Sonic’s moves & power-ups.
NiGHTMARE ZONE DLC Included
Includes NiGHTMARE Zone DLC free – featuring monsters inspired by the hit game ‘NiGHTS into Dreams’
PLUS – Now with new and improved PC Features:
60 FPS gameplay
HD resolution support
Full PC Gamepad + Keyboard support
Full Steam functionality
 Tags:- Sonic Lost World Syndicate Gold Edition Preload, Sonic Lost World Syndicate Gold Edition Preload torrent, Sonic Lost World Syndicate Gold Edition Preload download, Sonic Lost World Syndicate Gold Edition Preload uplay, Sonic Lost World Syndicate Gold Edition, Sonic Lost World Syndicate Gold Edition torrent, Sonic Lost World Syndicate Gold Edition crack, Sonic Lost World Syndicate Gold Edition preload, Sonic Lost World Syndicate Gold Edition preload torrent, Sonic Lost World Syndicate Gold Edition uplay preload, Sonic Lost World Syndicate Gold Edition unlocker, Sonic Lost World Syndicate Gold Edition crack only,


MINIMUM:
- OS: Microsoft Windows 7 / 8 / 10
- Processor: Intel Pentium Dual-Core T4200 (2×2.0GHz) or AMD equivalent
- Memory: 2 GB RAM
- Graphics: NVIDIA GeForce 8800 (512MB) / ATI Radeon HD 2900 (512MB)
- DirectX: Version 9.0c
- Hard Drive: 8 GB available space
- Sound Card: 9.0c compatible.
RECOMMENDED:
- OS: Microsoft Windows 7
- Processor: Intel Core i5 @ 2.66 GHz / AMD Phenom II X4 @ 3.0 GHz
- Memory: 3 GB RAM
- Graphics: NVIDIA GeForce GTX 460 (1GB) / ATI Radeon HD 5850 (1GB)
- DirectX: Version 9.0c
- Hard Drive: 8 GB available space
- Sound Card: 9.0c compatible.
- Additional Notes:Caution:ATI Mobility Radeon HD 5xxx, 1GB VRAM 5000 series may not work properly with this game.


| Click On any link n Wait 5 seconds then Skip Ads | ||
| Download Torrent Client | U torrent | |
| Download Server 1 | Download Torrent | |
| Download Server 2 | Download Torrent | |
Ghosting An Image With Photoshop CS6-Photoshop tutorial
Ghosting An Image With Photoshop CS6
In this photo effects tutorial, we’ll learn how to “ghost” an image. In other words, we’ll see how to give someone in a photo a more ghostly, supernatural look, a great effect whether you’re a fan of horror movies or just looking for a fun and easy way to spruce up a photo for Halloween. This new version of our original Ghosting An Image tutorial is now fully updated for Photoshop CS6 and compatible with Photoshop CC (Creative Cloud). Check out the original version if you’re using Photoshop CS5 or earlier.
New in this version of the tutorial, we’ll be using Smart Objects and Smart Filters to create much of the effect, and we’ll also be taking advantage of Photoshop’s ability to nest Smart Objects inside of other Smart Objects! As we’ll see, the benefit is that each of the Smart Filters we’ll be applying to the image will have its own unique layer mask! If that sounds more advanced than your current Photoshop skill level, don’t worry. As with all of our Photoshop tutorials, I’ll be explaining every step along the way.
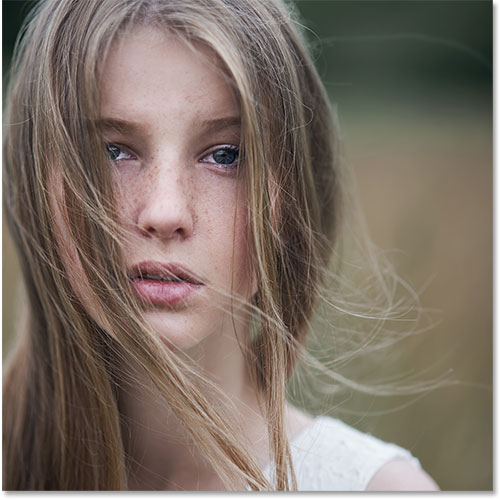
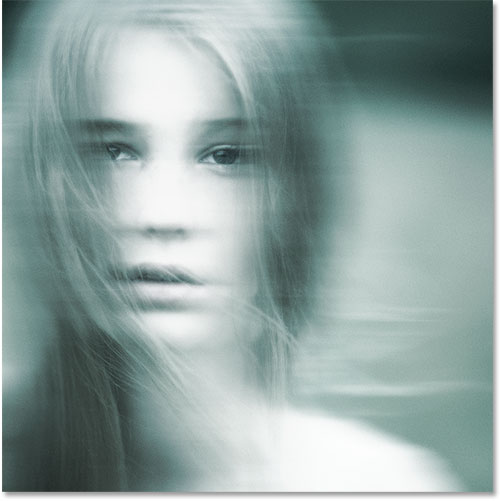
Of course, when creating any type of photo effect, it helps to start with the right type of image. Here’s the one I’ll be using (girl in field photo from Shutterstock):
And here’s what the final “ghosting” effect will look like:
Let’s get started!
Step 1: Convert The Background Layer Into A Smart Object
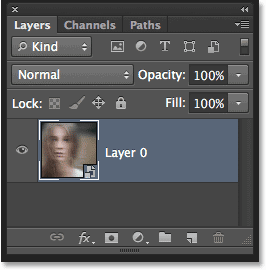
With my photo newly opened in Photoshop, if we look in my Layers panel, we see the image sitting on the Background layer which is currently the only layer in the document:
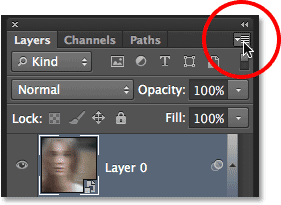
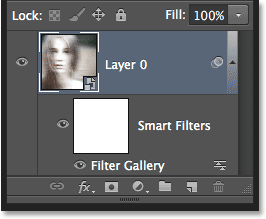
Let’s convert this Background layer into a Smart Object. Click on the small menu icon in the top right corner of the Layers panel:
![]()
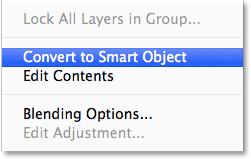
Choose Convert to Smart Object from the menu that appears:
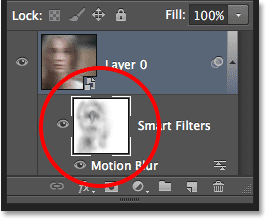
It won’t look like anything has happened to the image, but we can now see a small Smart Object icon in the bottom right corner of the layer’s preview thumbnail in the Layers panel. This is Photoshop’s way of telling us the layer is now a Smart Object:
![]()
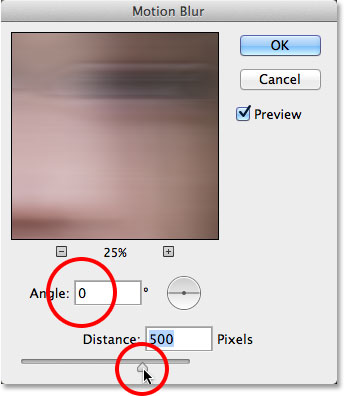
Step 2: Apply The Motion Blur Filter
We’ll use a couple of Photoshop’s filters to create the main ghosting effect, and we’ll start with the Motion Blur filter. Go up to the Filter menu in the Menu Bar along the top of Photoshop’s interface, choose Blur, then choose Motion Blur:
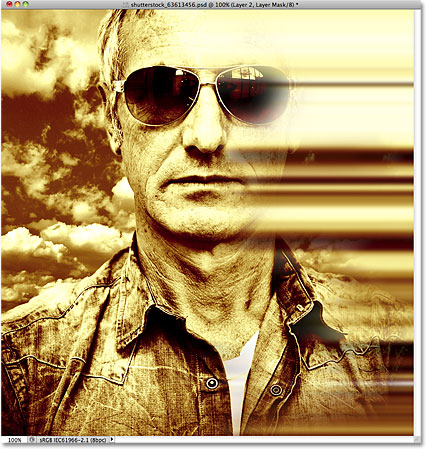
This opens the Motion Blur filter’s dialog box. Start by setting the Angle for the blur to 0°. Then, increase the amount of blurring by dragging the Distance slider along the bottom of the dialog box. The further you drag it to the right, the more motion blur will be applied. The exact amount you use will depend a lot on the size of your image. In the original version of this tutorial, I was using a fairly small photo so I set my Distance value to around 95 pixels. This time, I’m using a much larger image so to achieve the same amount of blurring, I need to set the value much higher (to around 500 pixels). The easiest thing to do is to keep an eye on your image in the document window to judge the results as you drag the slider:
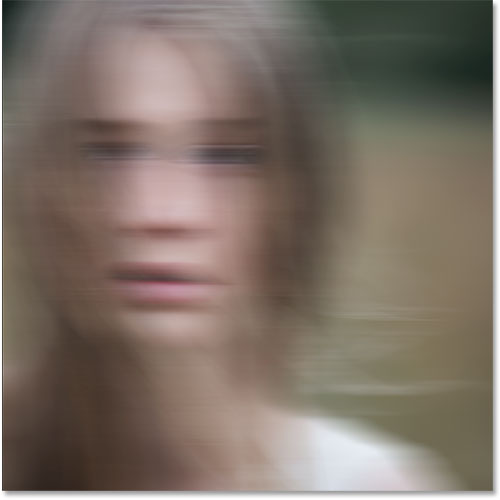
Click OK when you’re done to close out of the Motion Blur dialog box. Your blur effect should look similar to this:
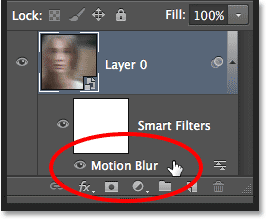
If we look again in the Layers panel, we see that because we first converted the Background layer into a Smart Object, the Motion Blur filter was added as a Smart Filter. If you don’t think you added enough of a blurring effect, or maybe you added too much, just double-click on the Motion Blur filter’s name below the Smart Object to re-open its dialog box and re-adjust the Distance slider. Your changes will be instantly updated in the image (click OK to close out of the dialog box again when you’re done):
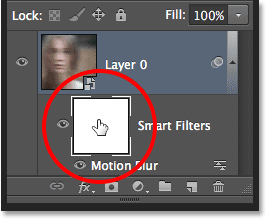
Step 3: Select The Smart Filter Mask
Click on the Smart Filter’s mask thumbnail in the Layers panel to select the mask. A white highlight border will appear around it letting you know it’s selected:
Step 4: Select The Brush Tool
We’re going to use the mask to bring back some of the original non-blurred areas of the image. Select Photoshop’s Brush Tool from the Tools panel along the left of the screen (or press the letter B on your keyboard to select the Brush Tool with the shortcut):
Step 5: Set The Brush Color To Black
We’ll need to paint on the mask with black to reveal some of the original photo, which means we first need to set our brush color to black. Photoshop uses the current Foreground color as the brush color, so with the mask selected in the Layers panel, press the letter D on your keyboard. This will reset the Foreground and Background colors to their defaults, with white as the Foreground color and black as the Background color. Then, press the letter X on your keyboard to swap them, which sets the Foreground color to black.
You can see the current Foreground and Background colors in the color swatches near the bottom of the Tools panel. The Foreground color (upper left swatch) should now be black:
Step 6: Lower The Brush Opacity To 25%
With the Brush Tool selected, go up to the Options Bar along the top of the screen and lower the Opacity value to 25%. This will allow us to reveal the original image gradually with each brush stroke, making it easier to fine-tune the amount of blurring in a certain area (rather than the “all or nothing” approach we’d get by painting with a brush opacity of 100%):

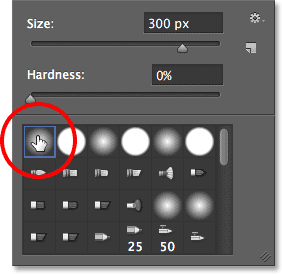
Step 7: Select A Round, Soft-Edge Brush
Right-click (Win) / Control-click (Mac) anywhere inside the image to open the Brush Preset picker and choose a round, soft-edge brush from the list. I’ll choose the very first one in the top left corner by clicking on its icon. This gives us a brush with a Hardness value of 0%, or in other words, the softest edge possible. Press Enter (Win) / Return (Mac) when you’re done to close out of the dialog box:
Step 8: Paint Over Areas To Reveal The Original Photo
With the Brush Tool in hand, black as your Foreground color and the brush opacity lowered to 25%, begin painting over areas where you want to reveal the original image through the motion blur effect, like the person’s eyes, nose and mouth. Each time you paint a brush stroke over the same area, you’ll reveal a bit more of the original image (make sure to release your mouse button in between brush strokes). You can adjust the size of your brush directly from your keyboard. Press the right bracket key ( ] ) repeatedly to make the brush larger or the left bracket key ( [ ) to make it smaller. If you accidentally paint over the wrong area, or you’ve revealed too much of the original image in a certain area, press the letter X on your keyboard to swap the Foreground and Background colors, which will set your Foreground color to white. Paint over the area with white to bring back the motion blur effect, then press X again to set your Foreground color back to black and continue painting.
Here, I’ve painted over the center area of the girl’s face to reveal her eyes, nose and mouth through the motion blur effect, and I’ve also painted along some of her hair:
If we look at the mask thumbnail in the Layers panel, we can see where we painted with black. The rest of the area (filled with white) is where the motion blur effect remains at full strength:
Step 9: Nest The Smart Object Inside Another Smart Object
We’ve applied the Motion Blur filter, so we’re ready to add our second filter. This second filter will need to be applied to the entire image, and that creates a potential problem. We’ll need a separate mask for each of our filters, yet Photoshop only gives us one mask that’s shared between all Smart Filters applied to the same Smart Object. We’ve already used that mask to hide some of the motion bur effect, so how can we get a separate mask for our second filter?
The answer is simple. We just need to nest our existing Smart Object inside another one! To do that, with the original Smart Object selected in the Layers panel, click once again on the menu icon in the top right corner of the Layers panel:
Choose Convert to Smart Object from the list, just as we did before:
It looks like we’ve lost our original Smart Object in the Layers panel, or at least lost the Motion Blur Smart Filter that was listed below it, but what’s actually happened is that Photoshop has nested our initial Smart Object, along with its Motion Blur filter effect, inside a brand new Smart Object:
Step 10: Apply The Diffuse Glow Filter
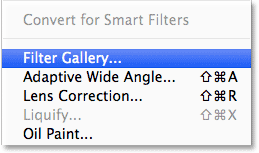
Let’s apply our second filter, Diffuse Glow, which adds a glow effect to the image using our current Background color as the color for the glow. Before we select the filter, press the letter D on your keyboard just to quickly reset your Foreground and Background colors. This will make sure our Background color is set to white. Then, go up to the Filter menu at the top of the screen and choose Filter Gallery:
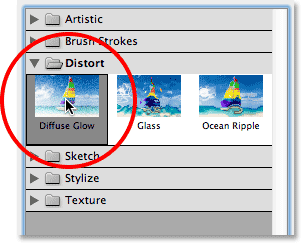
This opens Photoshop’s large Filter Gallery dialog box, with a preview area on the left, the filters and filter categories in the middle column, and options for the currently selected filter on the right. Click on the Distort category in the middle column to twirl it open, then click on the Diffuse Glow filter to select it:
Related Tutorial: Restore Missing Filters in Photoshop CS6
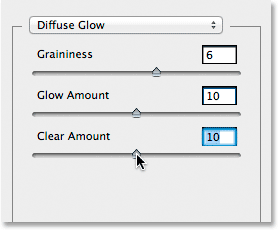
The options for the Diffuse Glow filter appear along the right of the Filter Gallery, and there’s three options we can set. The first is Graininess, which adds a grain effect (you probably figured that one out). I’m going to set my Graininess value to 6 but as with each of these options, feel free to experiment on your own and see what you think works best.
The second option, Glow Amount, controls the intensity of the glow. I’ll set mine to 10. Finally, Clear Amount behaves like the opposite to Glow Amount. Lower settings increase the range of the glow, causing more of the image to be affected, while higher settings limit its range. I’ll set mine to 10 as well, but as I mentioned, feel free to try different settings with your image:
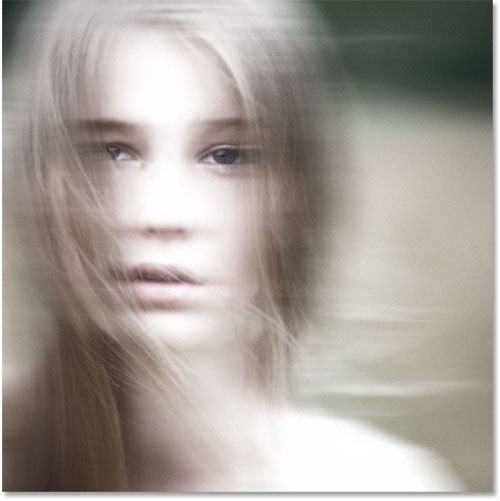
Click OK when you’re done to accept your settings and close out of the Filter Gallery. Here’s my image with Diffuse Glow applied:
If we look in the Layers panel, we see the Filter Gallery listed as a Smart Filter under the Smart Object. We also see that because we nested our initial Smart Object inside this second one, we now have a brand new mask to use with our Diffuse Glow filter, even though there’s nothing we need to do with it since we want the Diffuse Glow effect to apply to the entire image:
If you want to go back and edit any of your settings for the Diffuse Glow filter, simply double-click on the Filter Gallery Smart Filter. Or, if you find your glow effect is too strong, you can reduce its opacity value by double-clicking on the Blending Options icon:
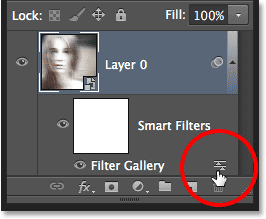
This will open the Blending Options dialog box where you can either lower the filter’s opacity or change its blend mode. You’ll want to leave the blend mode set to Normal, but I’ll lower my opacity down to 90% just to reduce the glow effect a little bit:
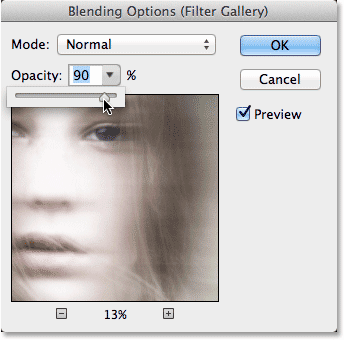
Click OK when you’re done to close out of the dialog box. Here’s my image after lowering the opacity:

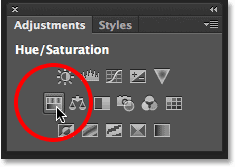
Step 11: Add A Hue/Saturation Adjustment Layer
Let’s finish off the ghosting effect by colorizing it with a Hue/Saturation adjustment layer. Click on the Hue/Saturation icon in the Adjustments panel (first icon on the left, middle row):
Photoshop adds a new Hue/Saturation adjustment layer directly above the Smart Object in the Layers panel:
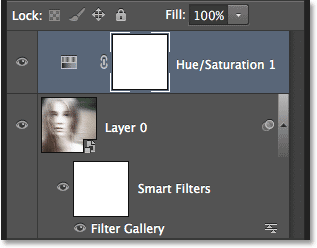
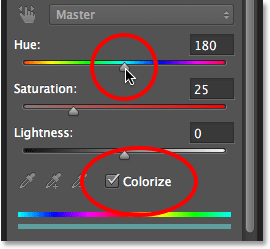
The controls and options for the Hue/Saturation adjustment layer appear in Photoshop’s Properties panel. First, select the Colorize option near the bottom of the panel by clicking inside its checkbox. This will allow us to colorize the entire image with a single color. Then, drag the Hue slider left or right to select a color. You’ll see the color changing in the document as you drag the slider. I think a greenish blue works well for the ghosting effect so I’ll set my Hue value to around 180:
Here’s my image after colorizing it:

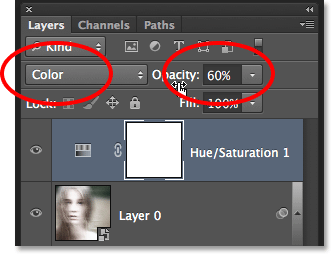
Step 12: Change The Blend Mode To Color And Lower The Opacity
Finally, change the blend mode of the Hue/Saturation layer from Normal to Color. The difference may be slight, but this will allow the adjustment layer to affect only the colors in the image without affecting the brightness values. You’ll find the blend mode option in the top left of the Layers panel. Directly across from the blend mode option is the Opacity option. Lowering it from its default value of 100% will allow some of the original colors from the image to show through. You may or may not like the result with your image so this final step is optional, but in my case, I’ll lower the opacity to around 60%:
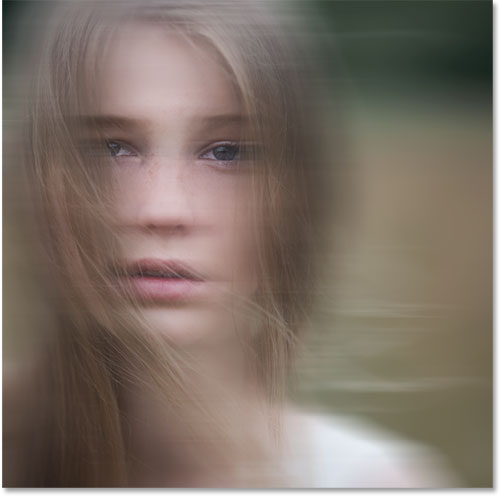
And with that, we’re done! Here, for comparison, is the original image once again:
And here, after changing the blend mode and lowering the opacity of the Hue/Saturation adjustment layer, is my final “ghost” effect:
 Tags :- Photoshop 8 , Photoshop 7 trick , trick for Photoshop CS6 , photoshop PNG , Png Images , image png , png , transparent images , transparent png , psd , psd image , png free , download png , png for free , png blogspot , png photoshop , photoshop png images , images for photoshop , cs5 trick , photoshop tricks , photoshop tricks , photoshop background , photoshop psd , photoshop cs5, photoshop cs5 trick,
Easy Selective Color Effect With Photoshop
Easy Selective Color Effect With Photoshop
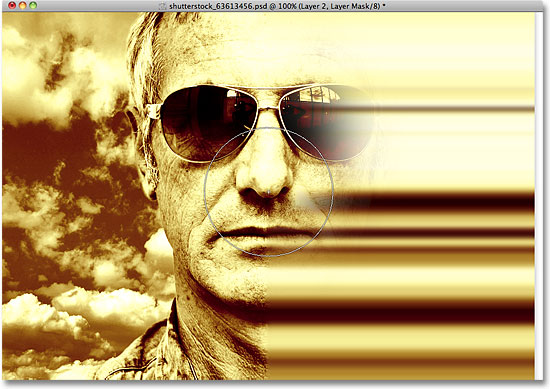
In this Photoshop Effects tutorial, we’ll learn how to create a cool motion blur-type of effect by first colorizing a photo, then selecting a single column of pixels from the main subject and stretching it across the image to create streaks of color.
We’ll use a layer mask and a brush when we’re done to paint away the streaks in areas where we don’t need them. If you’re wondering where the “Dead Zone” part of the name came from, the idea for this tutorial comes from the DVD box art for the final season of one of my favorite tv shows, The Dead Zone. I’ll be using Photoshop CS5, but any recent version of Photoshop will work.
Here’s what the final effect will look like:

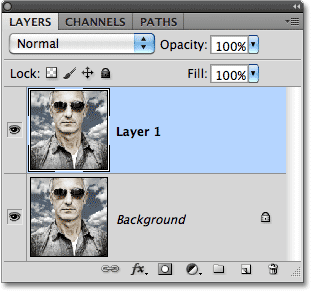
Step 1: Duplicate The Background Layer
Open the image you’ll be using for the effect. Here’s the photo I’ll be working with:

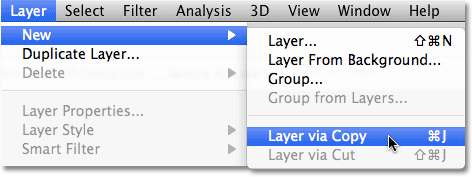
The first thing we want to do to is create a copy of the image so we’re not working directly on the original (in case we ever need it again later). The original image is sitting on the Background layer in the Layers panel. To make a copy of it, go up to the Layer menu in the Menu Bar along the top of the screen, choose New, then choose Layer via Copy. Or, for a faster way to copy a layer, press Ctrl+J (Win) / Command+J (Mac) on your keyboard:
A copy of the layer, which Photoshop names “Layer 1”, appears above the Background layer:
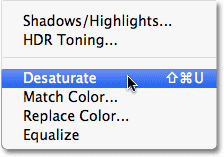
Step 2: Desaturate The Image
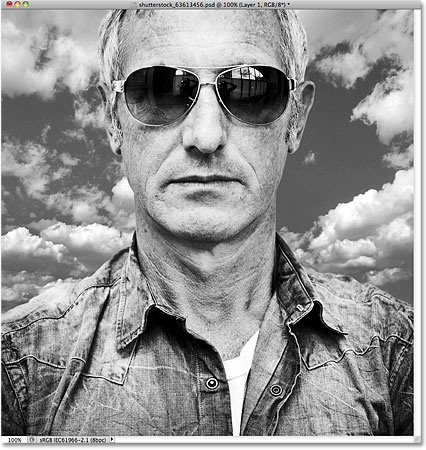
Next, before we colorize the image, let’s quickly remove the original colors by desaturating the photo. Go up to the Image menu at the top of the screen, choose Adjustments, and then choose Desaturate, or press Shift+Ctrl+U (Win) / Shift+Command+U (Mac) to access the Desaturate command with the faster keyboard shortcut:
The image will now appear in black and white, although in my case, the original colors were pretty subtle to begin with:
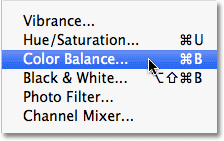
Step 3: Colorize The Image
With the original colors out of the way, let’s add our own. Go up to the Image menu once again, choose Adjustments, and then choose Color Balance:
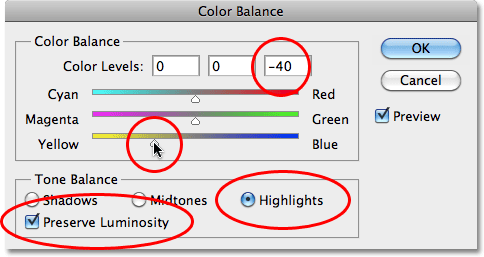
Photoshop’s Color Balance command allows us to choose different colors for the shadows, highlights and midtones of the image. If you want to use the same colors I’m using, first select the Highlights option in the dialog box, then drag the bottom of the three color sliders towards Yellow until the right Color Levels input box shows a value of –40. This adds yellow to the highlights. Make sure the Preserve Luminosity option is checked:
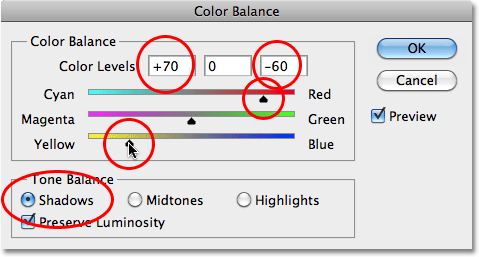
Next, select the Shadows option, then drag the top color slider towards Red until the left Color Levels input box shows a value of +70. Drag the bottom color slider once again towards Yellow until the right Color Levels input box shows -60. This adds an orange color to the shadows:
Click OK when you’re done to close out of the Color Balance dialog box. The colors in your image should now look similar to this (assuming you used the same colors I did):

Step 4: Select A Single Column Of Pixels
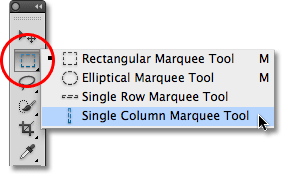
Grab the Single Column Marquee Tool from Photoshop’s Tools panel. By default, it’s hiding behind the Rectangular Marquee Tool, so click on the Rectangular Marquee Tool and hold your mouse button down for a second or two until a fly-out menu appears, then select the Single Column Marquee Tool from the list:
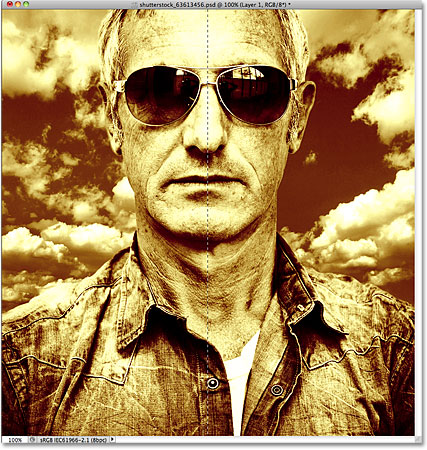
As its name implies, the Single Column Marquee Tool selects a single column of pixels in the image. Clicking anywhere in the image will select the pixel you clicked on plus every pixel above and below it from top to bottom. For this effect, we want to select a column of pixels that will divide the subject in half. I’m going to click in the center of the man’s nose. A very thin selection outline appears, dividing his left half from his right (it may be a little hard to see in the screenshot since the selection is only 1 pixel wide):
Step 5: Copy The Selection To A New Layer
Just as we did back in Step 1, go up to the Layer menu, choose New, and then choose Layer via Copy (or press Ctrl+J (Win) / Command+J (Mac) on your keyboard) to copy the selected column of pixels to its own layer. Nothing will seem to have happened to the image in the document window, but a new layer containing the column of pixels appears above the other layers in the Layers panel. Photoshop names the layer “Layer 2” (normally we should be giving our layers more descriptive names, like “colorized” and “pixel column”, but with only three layers needed for this effect, there’s not much use in renaming them):
Step 6: Stretch The Column With Free Transform
Go up to the Edit menu at the top of the screen and choose Free Transform, or press Ctrl+T (Win) / Command+T (Mac) to access Free Transform with the keyboard shortcut:
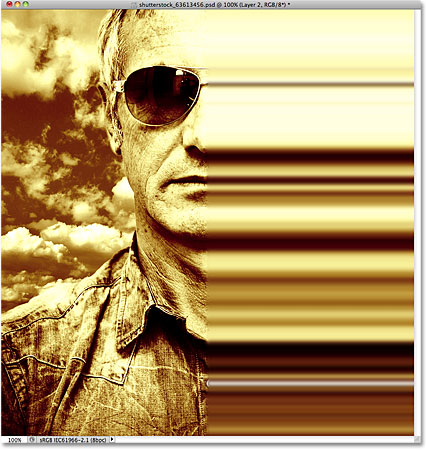
This places the Free Transform box and handles around the pixel column. Move your cursor directly over the column. You’ll see it turn into two small arrows pointing left and right. Click on the column and, with your mouse button still held down, drag the column towards the right. As you drag, you’ll see the pixels stretching and repeating across the image:
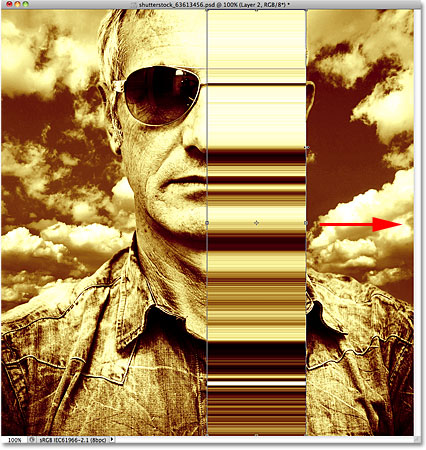
Continue dragging the column all the way to the right edge of the photo. Press Enter (Win) / Return (Mac) when you’re done to apply the transformation and exit out of the Free Transform command:
![]()
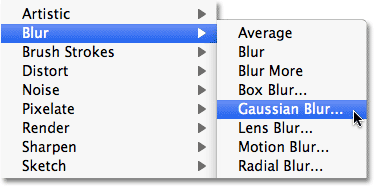
Step 7: Apply The Gaussian Blur Filter
Let’s apply a slight blur to the color streaks so they don’t appear so sharp and well-defined. Go up to the Filter menu at the top of the screen, choose Blur, and then choose Gaussian Blur:
When the Gaussian Blur dialog box appears, increase the Radius value to around 4 pixels by dragging the slider a little to the right. Click OK when you’re done to exit out of the dialog box and apply the blurring to the image:
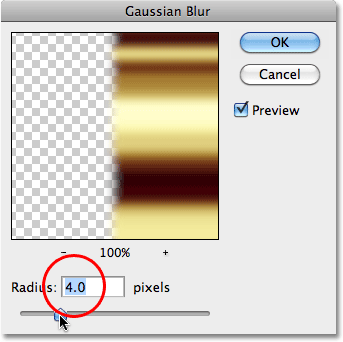
The transitions between the colors are now a little softer:
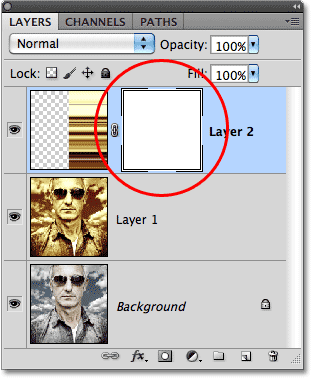
Step 8: Add A Layer Mask
All that’s left to do at this point is to blend the blur streaks in with the image, and we can do that using a layer mask. Click on the Layer Mask icon at the bottom of the Layers panel:
![]()
A layer mask thumbnail, filled with white, appears on Layer 2 in the Layers panel, letting us know that the mask has been added:
Step 9: Paint With Black On The Layer Mask To Hide The Color Streaks
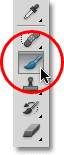
Grab the Brush Tool from the Tools panel:
Make sure the layer mask thumbnail is selected in the Layers panel (you should see a thin white highlight border around it which tells us it’s selected. Click on the thumbnail to select it if it’s not highlighted). Set your Foreground color to black by first pressing the letter D on your keyboard, which resets them to their default colors (white for the Foreground and black for the Background), then press the letter X to swap them, making black the Foreground color. You can see your current Foreground and Background colors by looking at the two color swatches near the bottom of the Tools panel:
Then, with a medium or large, soft-edge brush, simply paint over sections of the color streaks to hide them and reveal the main photo underneath. You can change the size of your brush as you paint by pressing the left bracket key ( [ ) on your keyboard to make it smaller or the right bracket key ( ] ) to make it larger. Holding down your Shift key while pressing the left bracket key will make the brush edges softer. Holding Shift and pressing the right bracket key makes the edges harder, although you’ll want to use a soft-edge brush to create smooth transitions between the color streaks and the main image.
Here, I’m painting with a large, soft-edge brush to reveal part of the man’s face behind the streaks:
If you make a mistake and reveal too much of the main image, simply press X on your keyboard to swap your Foreground and Background colors, which sets your Foreground color to white. Paint over the problem area with white to bring back the color streaks, then press X to swap the colors again and continue painting with black.
You can also change the opacity of your brush to create even more subtle transitions between the color streaks and the main image. Simply press a number on your keyboard to change the brush opacity. For example, to set the opacity to 50%, press the number 5. For something like 25%, press 2 5 quickly. To set the brush opacity back to the full 100%, press 0 (remember to set it back to 100% when you’re done to avoid possible confusion the next time you use the Brush Tool):

I’ll continue painting over the color streaks using different brush sizes and opacity settings, using the X key on my keyboard to swap between black and white for my brush color as needed. Here is my final result:
 Tags :- Photoshop 8 , Photoshop 7 trick , trick for Photoshop CS6 , photoshop PNG , Png Images , image png , png , transparent images , transparent png , psd , psd image , png free , download png , png for free , png blogspot , png photoshop , photoshop png images , images for photoshop , cs5 trick , photoshop tricks , photoshop tricks , photoshop background , photoshop psd , photoshop cs5, photoshop cs5 trick,
Dead Zone Blur Streaks Effect – Photoshop Tutorial
Dead Zone Blur Streaks Effect – Photoshop Tutorial
In this Photoshop Effects tutorial, we’ll learn how to create a cool motion blur-type of effect by first colorizing a photo, then selecting a single column of pixels from the main subject and stretching it across the image to create streaks of color.
We’ll use a layer mask and a brush when we’re done to paint away the streaks in areas where we don’t need them. If you’re wondering where the “Dead Zone” part of the name came from, the idea for this tutorial comes from the DVD box art for the final season of one of my favorite tv shows, The Dead Zone. I’ll be using Photoshop CS5, but any recent version of Photoshop will work.
Here’s what the final effect will look like:
Step 1: Duplicate The Background Layer
Open the image you’ll be using for the effect. Here’s the photo I’ll be working with:
The first thing we want to do to is create a copy of the image so we’re not working directly on the original (in case we ever need it again later). The original image is sitting on the Background layer in the Layers panel. To make a copy of it, go up to the Layer menu in the Menu Bar along the top of the screen, choose New, then choose Layer via Copy. Or, for a faster way to copy a layer, press Ctrl+J (Win) / Command+J (Mac) on your keyboard:
A copy of the layer, which Photoshop names “Layer 1”, appears above the Background layer:
Step 2: Desaturate The Image
Next, before we colorize the image, let’s quickly remove the original colors by desaturating the photo. Go up to the Image menu at the top of the screen, choose Adjustments, and then choose Desaturate, or press Shift+Ctrl+U (Win) / Shift+Command+U (Mac) to access the Desaturate command with the faster keyboard shortcut:
The image will now appear in black and white, although in my case, the original colors were pretty subtle to begin with:
Step 3: Colorize The Image
With the original colors out of the way, let’s add our own. Go up to the Image menu once again, choose Adjustments, and then choose Color Balance:
Photoshop’s Color Balance command allows us to choose different colors for the shadows, highlights and midtones of the image. If you want to use the same colors I’m using, first select the Highlights option in the dialog box, then drag the bottom of the three color sliders towards Yellow until the right Color Levels input box shows a value of –40. This adds yellow to the highlights. Make sure the Preserve Luminosity option is checked:
Next, select the Shadows option, then drag the top color slider towards Red until the left Color Levels input box shows a value of +70. Drag the bottom color slider once again towards Yellow until the right Color Levels input box shows -60. This adds an orange color to the shadows:
Click OK when you’re done to close out of the Color Balance dialog box. The colors in your image should now look similar to this (assuming you used the same colors I did):
Step 4: Select A Single Column Of Pixels
Grab the Single Column Marquee Tool from Photoshop’s Tools panel. By default, it’s hiding behind the Rectangular Marquee Tool, so click on the Rectangular Marquee Tool and hold your mouse button down for a second or two until a fly-out menu appears, then select the Single Column Marquee Tool from the list:
As its name implies, the Single Column Marquee Tool selects a single column of pixels in the image. Clicking anywhere in the image will select the pixel you clicked on plus every pixel above and below it from top to bottom. For this effect, we want to select a column of pixels that will divide the subject in half. I’m going to click in the center of the man’s nose. A very thin selection outline appears, dividing his left half from his right (it may be a little hard to see in the screenshot since the selection is only 1 pixel wide):
Step 5: Copy The Selection To A New Layer
Just as we did back in Step 1, go up to the Layer menu, choose New, and then choose Layer via Copy (or press Ctrl+J (Win) / Command+J (Mac) on your keyboard) to copy the selected column of pixels to its own layer. Nothing will seem to have happened to the image in the document window, but a new layer containing the column of pixels appears above the other layers in the Layers panel. Photoshop names the layer “Layer 2” (normally we should be giving our layers more descriptive names, like “colorized” and “pixel column”, but with only three layers needed for this effect, there’s not much use in renaming them):
Step 6: Stretch The Column With Free Transform
Go up to the Edit menu at the top of the screen and choose Free Transform, or press Ctrl+T (Win) / Command+T (Mac) to access Free Transform with the keyboard shortcut:
This places the Free Transform box and handles around the pixel column. Move your cursor directly over the column. You’ll see it turn into two small arrows pointing left and right. Click on the column and, with your mouse button still held down, drag the column towards the right. As you drag, you’ll see the pixels stretching and repeating across the image:
Continue dragging the column all the way to the right edge of the photo. Press Enter (Win) / Return (Mac) when you’re done to apply the transformation and exit out of the Free Transform command:
![]()
Step 7: Apply The Gaussian Blur Filter
Let’s apply a slight blur to the color streaks so they don’t appear so sharp and well-defined. Go up to the Filter menu at the top of the screen, choose Blur, and then choose Gaussian Blur:
When the Gaussian Blur dialog box appears, increase the Radius value to around 4 pixels by dragging the slider a little to the right. Click OK when you’re done to exit out of the dialog box and apply the blurring to the image:
The transitions between the colors are now a little softer:
Step 8: Add A Layer Mask
All that’s left to do at this point is to blend the blur streaks in with the image, and we can do that using a layer mask. Click on the Layer Mask icon at the bottom of the Layers panel:
![]()
A layer mask thumbnail, filled with white, appears on Layer 2 in the Layers panel, letting us know that the mask has been added:
Step 9: Paint With Black On The Layer Mask To Hide The Color Streaks
Grab the Brush Tool from the Tools panel:
Make sure the layer mask thumbnail is selected in the Layers panel (you should see a thin white highlight border around it which tells us it’s selected. Click on the thumbnail to select it if it’s not highlighted). Set your Foreground color to black by first pressing the letter D on your keyboard, which resets them to their default colors (white for the Foreground and black for the Background), then press the letter X to swap them, making black the Foreground color. You can see your current Foreground and Background colors by looking at the two color swatches near the bottom of the Tools panel:
Then, with a medium or large, soft-edge brush, simply paint over sections of the color streaks to hide them and reveal the main photo underneath. You can change the size of your brush as you paint by pressing the left bracket key ( [ ) on your keyboard to make it smaller or the right bracket key ( ] ) to make it larger. Holding down your Shift key while pressing the left bracket key will make the brush edges softer. Holding Shift and pressing the right bracket key makes the edges harder, although you’ll want to use a soft-edge brush to create smooth transitions between the color streaks and the main image.
Here, I’m painting with a large, soft-edge brush to reveal part of the man’s face behind the streaks:
If you make a mistake and reveal too much of the main image, simply press X on your keyboard to swap your Foreground and Background colors, which sets your Foreground color to white. Paint over the problem area with white to bring back the color streaks, then press X to swap the colors again and continue painting with black.
You can also change the opacity of your brush to create even more subtle transitions between the color streaks and the main image. Simply press a number on your keyboard to change the brush opacity. For example, to set the opacity to 50%, press the number 5. For something like 25%, press 2 5 quickly. To set the brush opacity back to the full 100%, press 0 (remember to set it back to 100% when you’re done to avoid possible confusion the next time you use the Brush Tool):
I’ll continue painting over the color streaks using different brush sizes and opacity settings, using the X key on my keyboard to swap between black and white for my brush color as needed. Here is my final result:
 Tags :- Photoshop 8 , Photoshop 7 trick , trick for Photoshop CS6 , photoshop PNG , Png Images , image png , png , transparent images , transparent png , psd , psd image , png free , download png , png for free , png blogspot , png photoshop , photoshop png images , images for photoshop , cs5 trick , photoshop tricks , photoshop tricks , photoshop background , photoshop psd , photoshop cs5, photoshop cs5 trick,
Create A Collage Of Polaroids From A Single Photo With Photoshop
Create A Collage Of Polaroids From A Single Photo With Photoshop

In this Photo Effects tutorial, we’ll learn how to turn any image into a collage of polaroids. In other words, we’ll create what looks like a bunch of polaroid photos spread out randomly on the background, yet within each polaroid is a small section of your larger overall image. It may look complicated at first, but as we’ll see, it’s actually a very easy effect to create in Photoshop, especially since much of the work is just simple repetition.
This version of the tutorial has been completely re-written and updated from the original and is now fully compatible with both Photoshop CS6 and Photoshop CC (Creative Cloud). It also features a slightly different way of creating the effect (compared with the way I covered in the original version), this time taking advantage of Photoshop’s shape layers as well as a little-known but very powerful feature found in Photoshop’s Advanced Blending options. Don’t let the “Advanced” part fool you, though. Anyone can do this, and as always, I’ll be covering every step along the way.
As I mentioned, you’ll need Photoshop CS6 or CC to follow along. If you’re using Photoshop CS5 or earlier, you’ll want to check out our original Turn A Photo Into A Collage Of Polaroids tutorial.
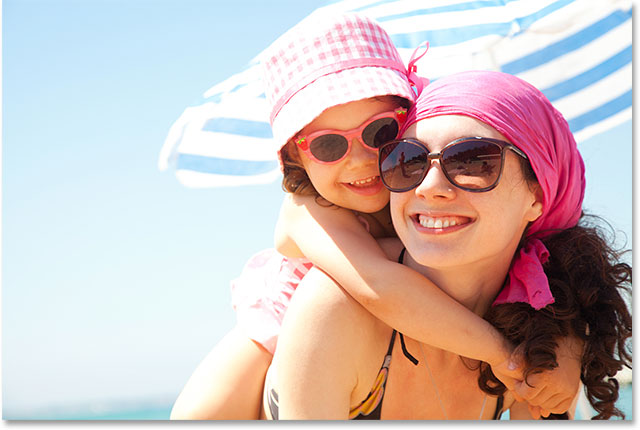
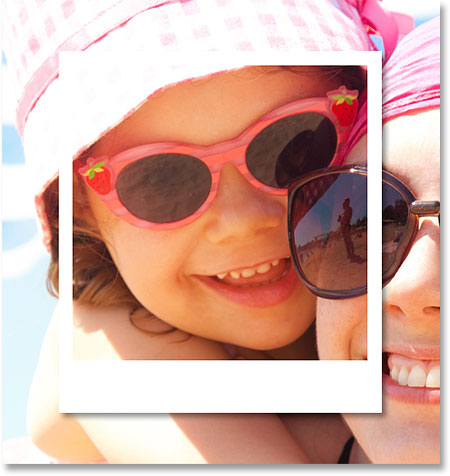
Here’s the image I’ll be using (mom and daughter vacation photo from Shutterstock):
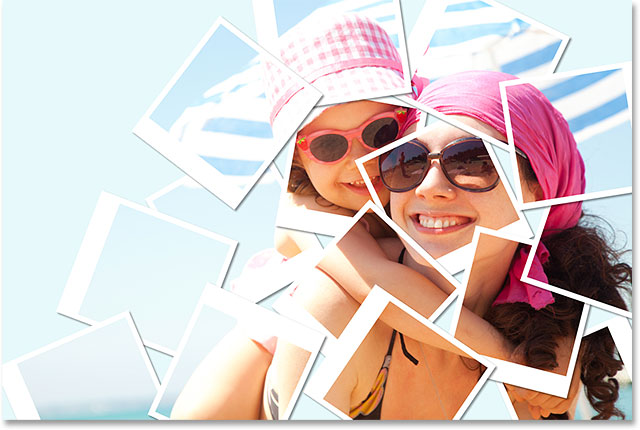
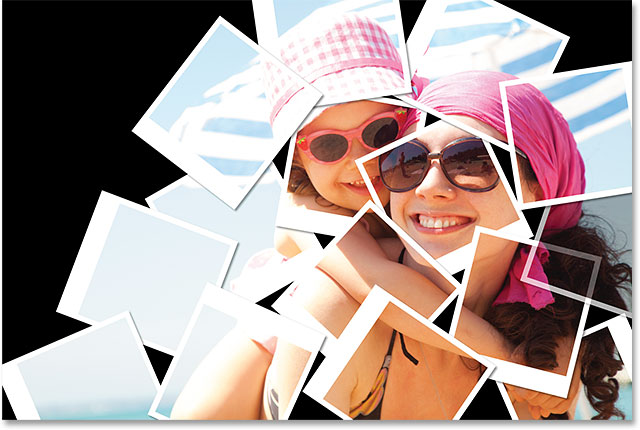
And here’s what the final “collage of polaroids” effect will look like:
Let’s get started!
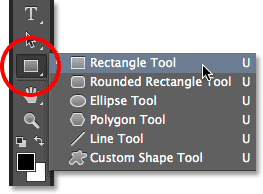
Step 1: Select The Rectangle Tool
With our image newly opened in Photoshop, let’s begin our polaroid collage effect by creating our first polaroid. To create it, we’ll use one of Photoshop’s shape tools – the Rectangle Tool. Click on its icon in the lower half of the Tools panel to select it. If a different shape tool is visible in its place, click and hold on the tool to bring up the fly-out menu, then select the Rectangle Tool from the list:
Step 2: Set The Tool Mode To Shape
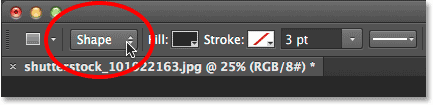
Photoshop’s shape tools let us draw vector shapes, paths or pixel-based shapes. We want to draw our polaroid using vector shapes, which will not only keep the edges nice and sharp but will also keep our overall file size from getting out of hand as we add more and more polaroids to the collage. To set the Rectangle Tool to draw vector shapes, set the Tool Mode option on the far left of the Options Bar to Shape:
Step 3: Set The Fill Color To Black And The Stroke To None
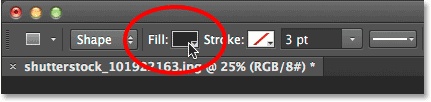
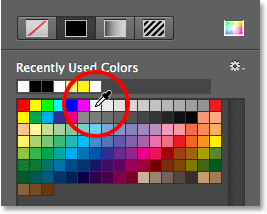
Let’s set the color of our rectangle shape to black, since this shape will be used as the area in the center of the polaroid where the photo appears. It actually doesn’t matter what color we use for this shape. Black is just easy to see in front of our image. To set its color to black, click on the Fill color swatch up in the Options Bar. You may notice that mine is already set to black, but that’s okay:
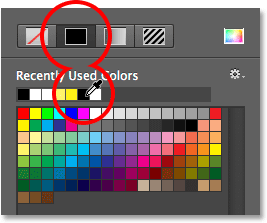
Clicking the color swatch opens the Fill Type dialog box where we choose the type of fill we want for the shape. There’s four different fill types to choose from, and we switch between them using the four icons displayed in a row in the upper left of the dialog box. Each icon represents a different fill type. Starting from the left, we have None (for no fill at all), Solid Color, Gradient, and then Pattern. We want to fill our shape with a solid color, so click the Solid Color icon (second from the left) to select it. Then, choose black from the color swatches that appear. I’ll choose it from my list of Recently Used Colors, but you can also choose it from the main swatch area. When you’re done, press Enter (Win) / Return (Mac) on your keyboard to close out of the dialog box:
We also need to make sure our shape does not have a stroke applied around its edges. To do that, click on the Stroke swatch directly to the right of the Fill swatch in the Options Bar:
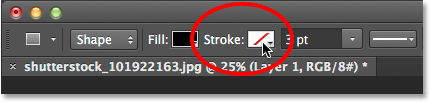
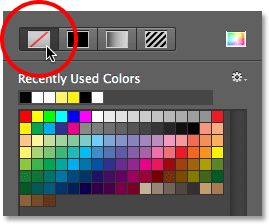
This opens the Stroke Type dialog box which looks exactly like the Fill Type dialog box, but these options apply to the stroke. Since we don’t want any stroke at all, click the None icon in the upper left of the dialog box (the one with the diagonal red line through it). Press Enter (Win) / Return (Mac) when you’re done to close out of it:
Step 4: Drag Out A Square Shape
With the Rectangle Tool selected, black as the Fill color and Stroke set to None, press and hold the Shift key on your keyboard, then click and drag out your shape. Holding the Shift key down as you drag will force the shape into a perfect square, but make sure you release your mouse button before releasing the Shift key otherwise it won’t work. You can also move the shape around as you’re drawing it by pressing and holding the spacebar on your keyboard as you drag.
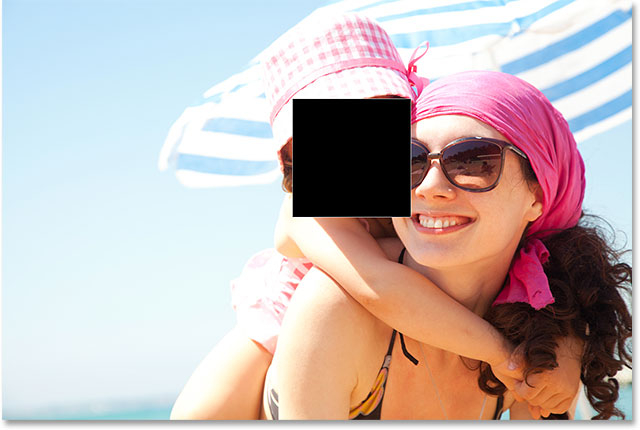
Since this shape will be used as the center area of the polaroid where the image appears, I’ll drag out my shape so it’s roughly large enough to fit the little girl’s face inside of it. For your effect, you may want the polaroids larger or smaller, but I think this size works well for this image. Here, we see the outline of the shape as I’m drawing it:
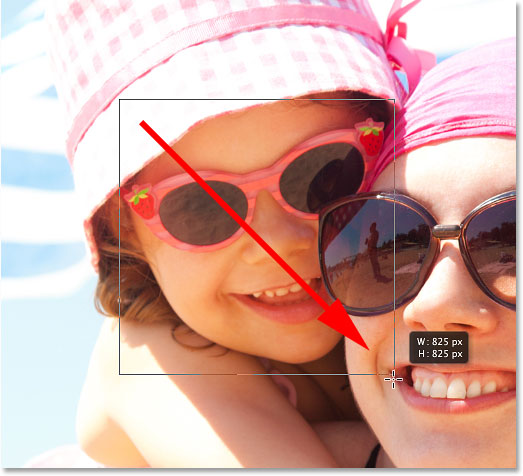
When you release your mouse button (and then release your Shift key), that’s when the shape actually appears with your chosen fill color. Here we see it temporarily blocking the girl’s face from view:
Note for Photoshop CC Users: In Photoshop CC, Adobe has introduced a new Live Shapes feature, and as soon as you’ve drawn your shape, the Properties panel will open to the new Live Shape Properties. We won’t be doing anything with these options here, so feel free to close or minimize the Properties panel. Again, this is only for Photoshop CC users. Photoshop CS6 does not offer Live Shapes.
Step 5: Duplicate The Shape Layer
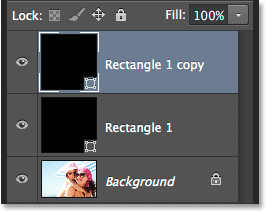
If we look in the Layers panel, we see the newly added shape layer, which Photoshop has named “Rectangle 1”, sitting above the image on the Background layer:

Let’s make a copy of this shape, which we’ll then resize to create the outer frame of the polaroid. To duplicate it, make sure the shape layer is selected (highlighted in blue) in the Layers panel. Then go up to the Layer menu in the Menu Bar along the top of the screen, choose New, then choose Shape Layer Via Copy. Or, an even faster way to duplicate the layer is to just press Ctrl+J (Win) / Command+J (Mac) on your keyboard:
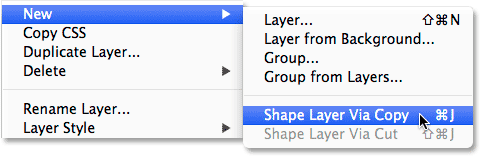
Photoshop duplicates the shape layer, gives the copy the generic name “Rectangle 1 copy” and places it above the original:
Step 6: Rename The Two Shape Layers
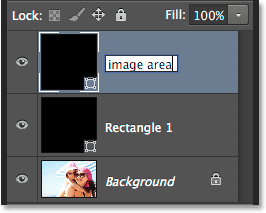
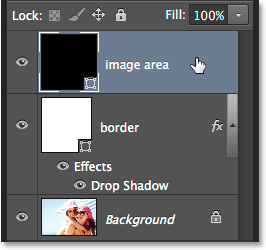
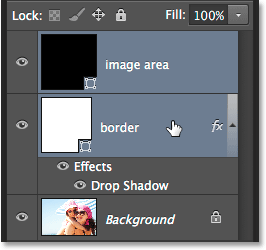
Before we continue, let’s replace those generic names that Photoshop gave our shape layers with names that are more meaningful. Beginning with Photoshop CS6, Adobe has made it much easier to rename multiple layers. We’ll use the top shape layer as the inner image area of the polaroid, so highlight its current name “Rectangle 1” by double-clicking on it, then rename the layer “image area”. Don’t press Enter (Win) / Return (Mac) to accept it yet, just leave the name highlighted:
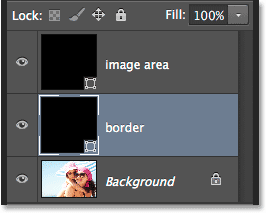
Press the Tab key on your keyboard to instantly jump down to the next layer below it and highlight its name. This layer will be used as the white border of the polaroid, so rename this second layer “border”. Press Enter (Win) / Return (Mac) on your keyboard when you’re done to accept the new name:
Step 7: Change The Shape Color To White
We’ll need the border area of our polaroid to be white, not black, so with the “border” layer selected in the Layers panel, click once again on the Fill color swatch in the Options Bar:
![]()
This re-opens the Fill Type dialog box. Leave the type set to Solid Color and choose white from the color swatches. Press Enter (Win) / Return (Mac) when you’re done. You won’t see the shape change color in the document yet because the black-filled shape is sitting on top of it and blocking it from view, but we’ll see it in a moment:
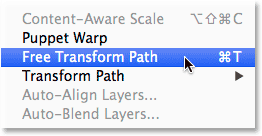
Step 8: Resize The Border Shape
With the color of the shape now set to white, go up to the Edit menu at the top of the screen and choose Free Transform Path. Or, press Ctrl+T (Win) / Command+T (Mac) on your keyboard to select the Free Transform Path command from the keyboard:
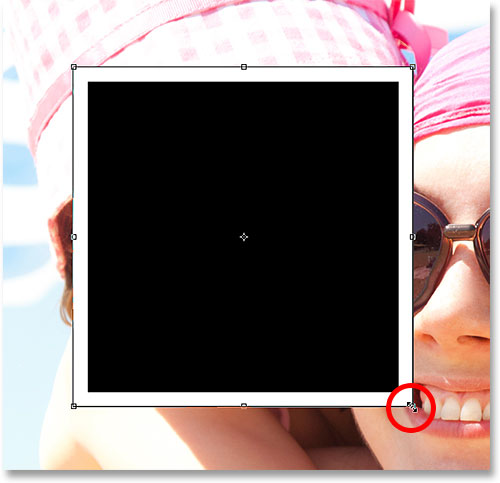
This places transform handles (those little squares) around the shape, and we can use these handles to resize it. To create a border around the image area, we need this white shape to be slightly larger than the black shape, so press Shift+Alt (Win) / Shift+Option (Mac) on your keyboard, and with the keys still held down, click on any of the four corner handles around the shape and drag a short distance outward until you’ve added enough border area. As we saw earlier, holding the Shift key forces the shape into a perfect square, and adding the Alt (Win) / Option (Mac) key along with it allows us to resize the shape from its center rather than from the corner. Again, remember to release your mouse button first when you’re done, then release the keys:
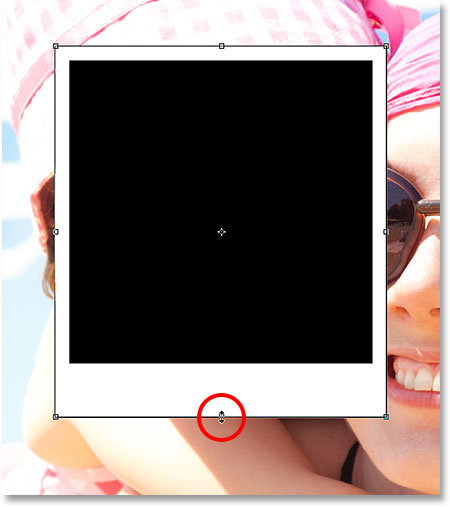
Polaroids have some extra border area along the bottom, so click on the bottom handle and drag it downward to add some additional space. No need to add any keys from the keyboard this time. When you’re done resizing the shape, press Enter (Win) / Return (Mac) on your keyboard to accept it and exit out of transform mode:
Step 9: Add A Drop Shadow To The Border
To give our polaroid collage a bit of depth, let’s add a drop shadow to the border. Click on the Layer Styles icon (the “fx” icon) at the bottom of the Layers panel:
![]()
Choose Drop Shadow from the bottom of the list that appears:
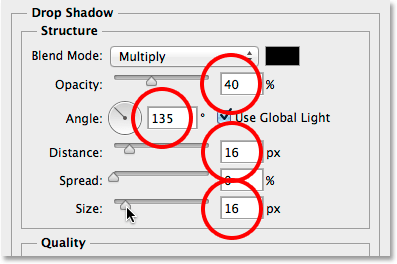
This opens the Layer Style dialog box set to the Drop Shadow options in the middle column. Lower the Opacity of the shadow to around 40% so it will appear more subtle, then change the Angle to 135° so the light source will be in the upper left. Finally, increase the Distance and Size options a little bit to control how far the shadow extends outward from behind the polaroid and how soft it appears. In my case, I’ll set both my Distance and Size values to around 16px, but you may need smaller or larger values depending on the size of your image. When you’re done, click OK to close out of the Layer Style dialog box:
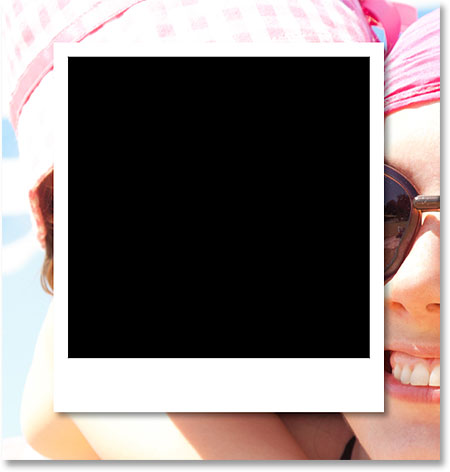
Here’s my polaroid with the drop shadow applied:
Step 10: Select The Image Area Layer
Click on the “image area” shape layer in the Layers panel to select it:
Step 11: Open The Blending Options
We’ve drawn our polaroid, but now we need a way to reveal our image inside the black-filled shape in the center of it. We can do that using the Knockout feature in Photoshop’s Blending Options. One way to get to the Blending Options is to click on the small menu icon in the top right corner of the Layers panel:
![]()
Then choose Blending Options from the menu that appears:
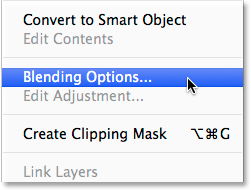
Photoshop once again opens the Layer Style dialog box, this time set to the main Blending Options. In the Advanced Blending section in the center, change the Knockout option from None to Deep:
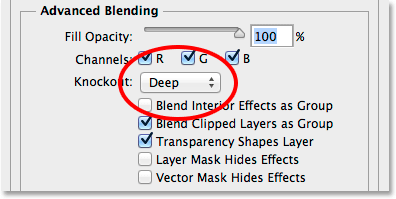
This will essentially turn our black shape into a hole that lets us see right through to the image on the Background layer! Or at least, it will in a moment. For it to work, we also need to lower the Fill Opacity all the way down to 0%. You’ll find the Fill Opacity option just above the Knockout option:
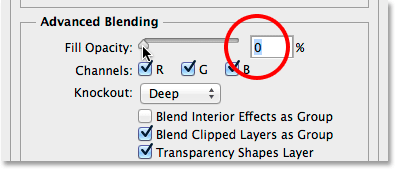
Click OK to close out of the Layer Style dialog box. With Fill Opacity set to 0%, our image is now fully visible inside the image area of the polaroid:
Step 12: Select Both Shape Layers
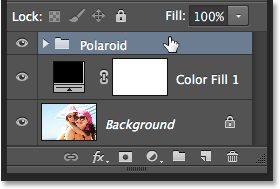
To create our collage, we’ll be making copies of this initial polaroid, so let’s make things easier by placing both of our shape layers into a layer group. To do that, we first need to have both shape layers selected. Currently, the top “image area” layer is selected in the Layers panel. Hold down the Shift key on your keyboard and click on the “border” layer below it to select both layers at once:
Step 13: Group The Layers
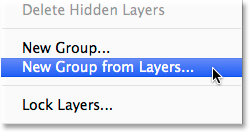
With both layers selected, click once again on the menu icon in the top right corner of the Layers panel:
![]()
Choose New Group from Layers from the menu:
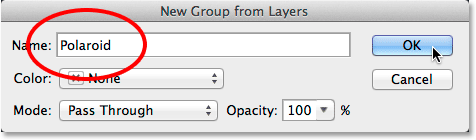
Photoshop will pop open the New Group From Layers dialog box where we can name the group before it’s added. I’ll name mine “Polaroid”. Click OK when you’re done to close out of the dialog box:
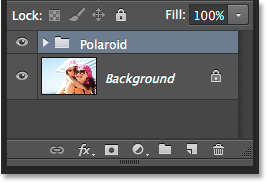
The new layer group appears above the Background layer in the Layers panel:
Step 14: Select The Background Layer
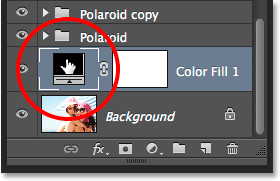
Before we start adding more polaroids to the collage, let’s first hide the main photo on the Background layer. We’ll use one of Photoshop’s Solid Color fill layers as the background for our collage. Click on the Background layer to select it:

Step 15: Add A Solid Color Fill Layer
With the Background layer selected, click on the New Fill or Adjustment Layer icon at the bottom of the Layers panel:
![]()
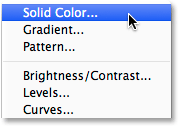
Choose Solid Color from the top of the list that appears:
This opens the Color Picker where we choose which color we want to fill the layer with. You can use any color you like, but I’m going to go with black for now. Later on, we’ll see how we can easily come back and change the color to something different:
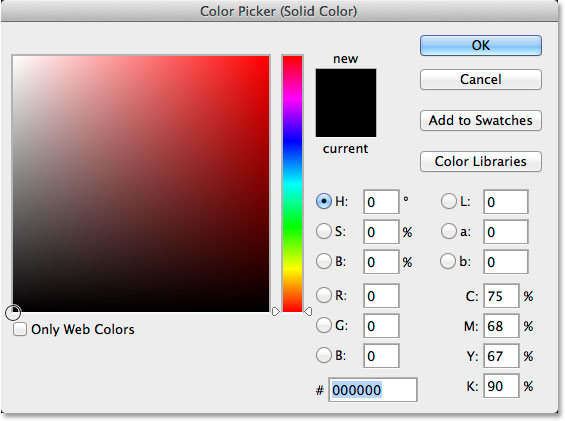
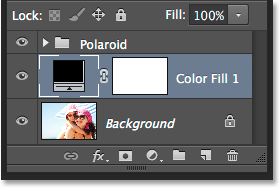
Click OK when you’re done to close out of the Color Picker. We can see the new Solid Color fill layer (named “Color Fill 1”) sitting between the “Polaroid” layer group and the Background layer in the Layers panel:
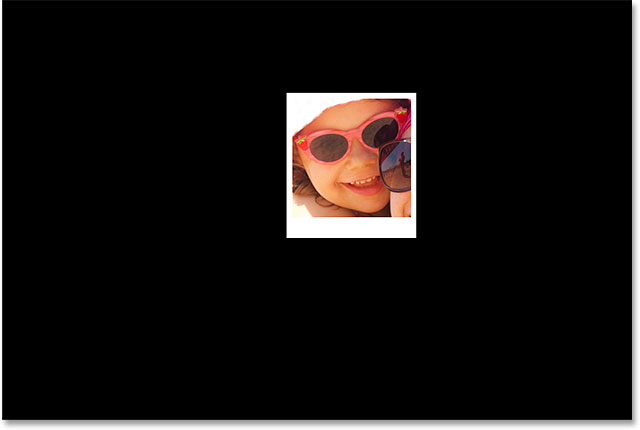
And in the document itself, we see that our polaroid is now sitting in front of a solid-colored background. The only part of our main image that’s still visible is the area inside the polaroid:
Step 16: Select The Layer Group
Let’s quickly rotate our polaroid to give it a bit more visual interest. Click on the “Polaroid” layer group in the Layers panel to select it:
Step 17: Rotate The Polaroid With Free Transform
With the layer group selected, go up to the Edit menu at the top of the screen and choose Free Transform. Or, press Ctrl+T (Win) / Command+T (Mac) to select Free Transform with the keyboard shortcut:
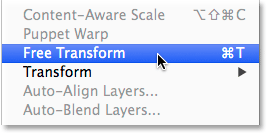
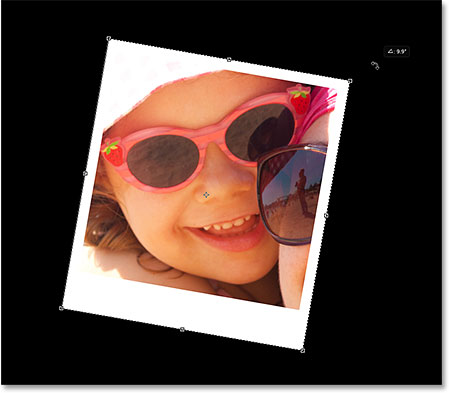
Then, move your cursor anywhere outside of the Free Transform box. When you see your cursor change into a curved, double-sided arrow, click and drag with your mouse to rotate the polaroid. When you’re done, press Enter (Win) / Return (Mac) to accept the rotation and exit out of Free Transform:
Step 18: Copy, Move And Rotate More Polaroids
At this point, all of the hard work is done. Creating the rest of the collage is simply a matter of duplicating the layer group to make a new polaroid, using Free Transform to move and rotate it into position, and then repeating the same steps over and over. To speed things up, rather than wasting time selecting commands from the Menu Bar at the top of the screen, I suggest using the faster keyboard shortcuts. I’ll go through the steps here once, and then as I said, it’s just a matter of repeating them until your collage is finished.
First, to add a new polaroid, press Ctrl+J (Win) / Command+J (Mac) on your keyboard. This will duplicate the one you added previously. It won’t look like anything new has been added in the document, but that’s because the new polaroid is sitting directly on top of the previous one. The Layers panel, however, will show that a copy of the polaroid has been added:

Then, to move the new polaroid into position and rotate it, select Free Transform by pressing Ctrl+T (win) / Command+T (Mac). To move the polaroid and reveal more of your image, click anywhere inside the Free Transform box and drag it with your mouse:
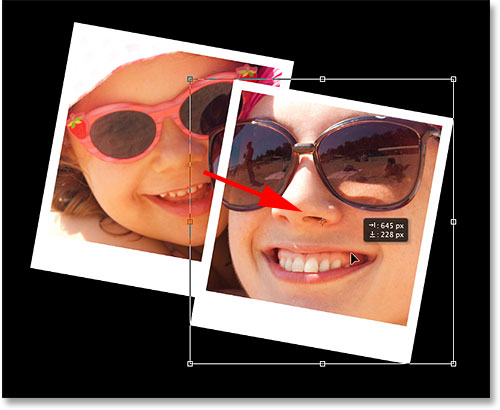
Rotate the polaroid just as we did before by clicking and dragging anywhere outside of the Free Transform box. When you’re done, press Enter (Win) / Return (Mac) to accept it. Or, you can also accept it and exit out of Free Transform simply by double-clicking anywhere inside the Free Transform box:
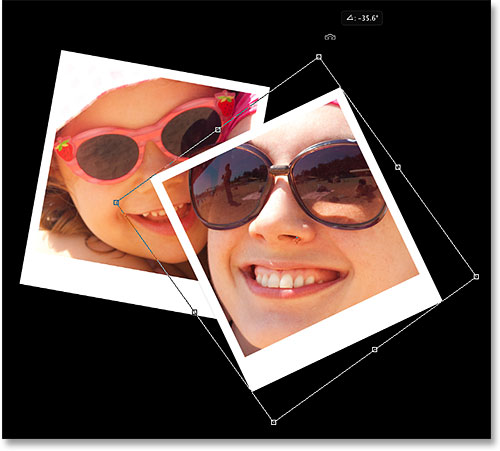
Continue adding more polaroids to your collage, moving them and rotating them into position following the same steps, pressing Ctrl+J (Win) / Command+J (Mac) to duplicate the previous polaroid, then Ctrl+T (Win) / Command+T (Mac) to move and rotate the new one with Free Transform just as we did above. Press Enter (Win) / Return (Mac) on your keyboard or double-click inside the Free Transform box to accept it. Here’s what my collage looks like. Notice how I arranged the polaroids to focus on the main subject of the photo without worrying too much about the rest of the image:
Step 19: Change The Background Color (Optional)
Earlier, we chose black as the background color for our collage, but if you get to this point and decide that black is just too dark, it’s easy to change the color. Double-click on the color swatch for the Solid Color fill layer in the Layers panel:
This will re-open the Color Picker. You can choose a different color from the Color Picker itself, or you can sample a color directly from the image. To sample a color, move your mouse cursor away from the Color Picker and over the image. You’ll see your cursor change into an eyedropper. Move the eyedropper over the color you want to use for the background, then click on the color to sample it. Here, I’m clicking on an area of light blueish gray in one of the polaroids:
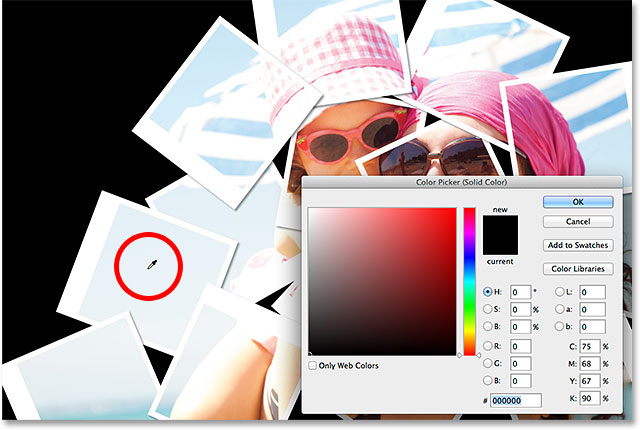
With the color sampled, click OK to close out of the Color Picker. Photoshop instantly updates the collage with your new background color:
Tags :- Photoshop 8 , Photoshop 7 trick , trick for Photoshop CS6 , photoshop PNG , Png Images , image png , png , transparent images , transparent png , psd , psd image , png free , download png , png for free , png blogspot , png photoshop , photoshop png images , images for photoshop , cs5 trick , photoshop tricks , photoshop tricks , photoshop background , photoshop psd , photoshop cs5, photoshop cs5 trick,
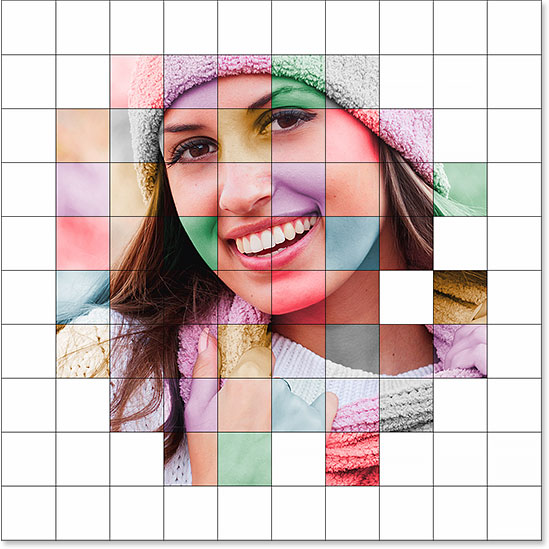
Color Grid Photo Display Effect With Photoshop Tutorial
Color Grid Photo Display Effect With Photoshop
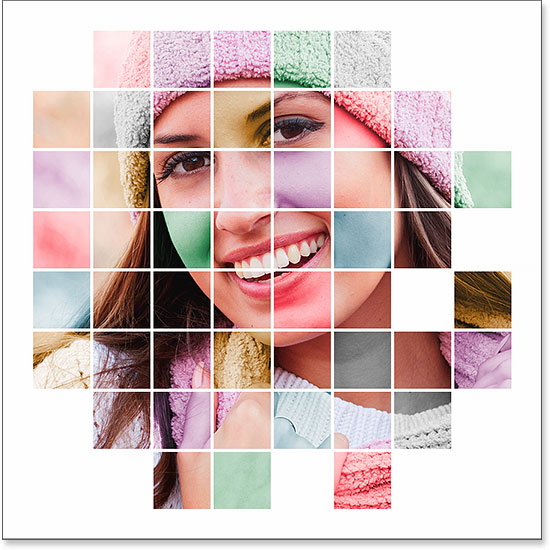
In this photo effects tutorial, we’ll learn how to display a photo in a grid of randomly colored squares! We’ll use Photoshop’s built-in grid feature as a guide for setting up the initial spacing, then we’ll turn it into a pixel-based grid using a couple of Photoshop’s rarely-used selection tools. We’ll see how to easily select different squares in the grid with the Magic Wand Tool, how to colorize them with adjustment layers and blend modes, and finally, how to adjust the appearance of the grid itself using layer styles!
This version of the tutorial has been updated for Photoshop CS6 and is also fully compatible with Photoshop CC (Creative Cloud). For CS5 and earlier, you’ll want to check out our original Color Grid Design tutorial.
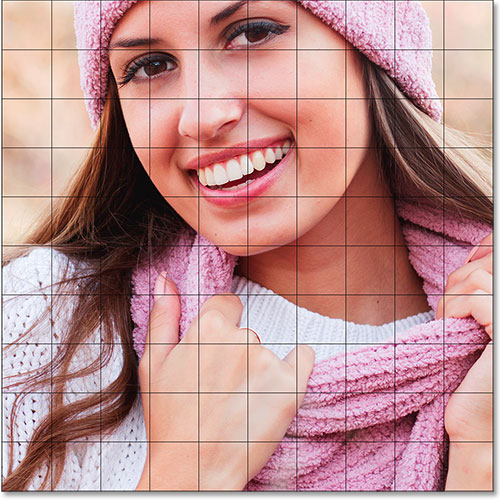
Here’s the image I’ll be working with (woman with winter clothing photo from Shutterstock):

And here’s how the color grid design will look when we’re done. Of course, you can use whichever colors you like for your effect. This is just one example:

Let’s get started!
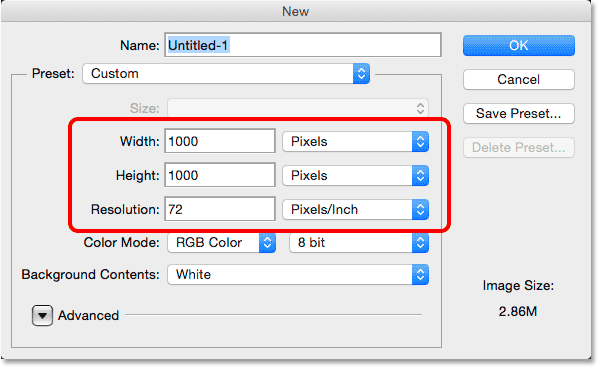
Step 1: Create A New Photoshop Document
Let’s begin by creating a new document for the grid. Go up to the File menu in the Menu Bar along the top of the screen and choose New:
This opens Photoshop’s New dialog box. This effect works best with a square-shaped document, so for this tutorial, I’ll set both my Width and Height values to 1000 Pixels. Of course, feel free to replace my values with whatever dimensions you need, but again, you’ll want a square document for the best results. I’m not planning on printing this (it will be strictly for on-screen viewing) so there’s no need to worry about the Resolution value (I’ll leave it set to its default of 72 pixels/inch), but if you are creating this effect for print, you’ll most likely want to create a document larger than 1000 x 1000 pixels and you’ll want to set your resolution to around 240 pixels/inch or higher. Click OK when you’re done to close out of the dialog box. The new document will appear on your screen:
Step 2: Turn On Photoshop’s Grid
Next, we’ll turn on Photoshop’s built-in grid so we can use it as a guide for creating our pixel-based grid. To turn the grid on, go up to the View menu at the top of the screen, choose Show, then choose Grid:
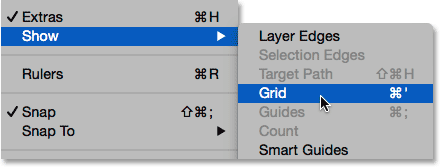
The grid will appear as an overlay on top of your document. We’ll make some changes to the appearance of the grid next:
Step 3: Adjust The Number Of Grid Lines
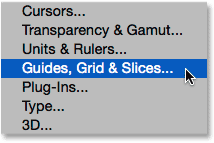
We can adjust the number of lines and sections in the grid using Photoshop’s Preferences. If you’re running Photoshop on a Windows PC, go up to the Edit menu at the top of the screen, choose Preferences, then choose Guides, Grid & Slices. On a Mac, go up to the Photoshop menu, choose Preferences, then choose Guides, Grid & Slices:
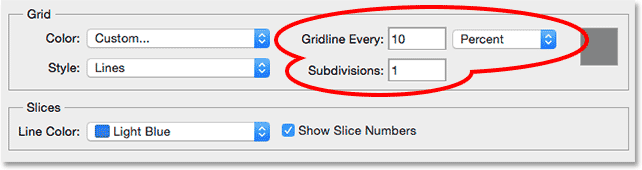
This opens the Preferences dialog box set to the Guides, Grid and Slices preferences. In the Grid section, change the Gridline Every option to 10 Percent, which will give us a 10×10 grid, and change the Subdivisions value to 1 to prevent the grid from being subdivided into smaller sections. Keep an eye on the grid in the document and you’ll see a live preview of the changes as you’re making them:
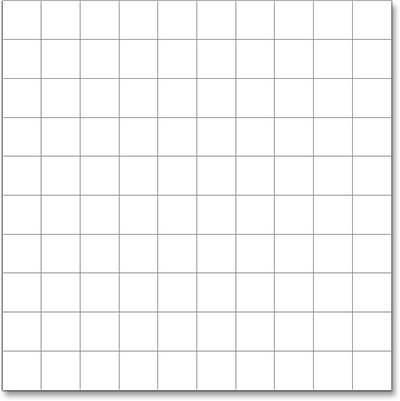
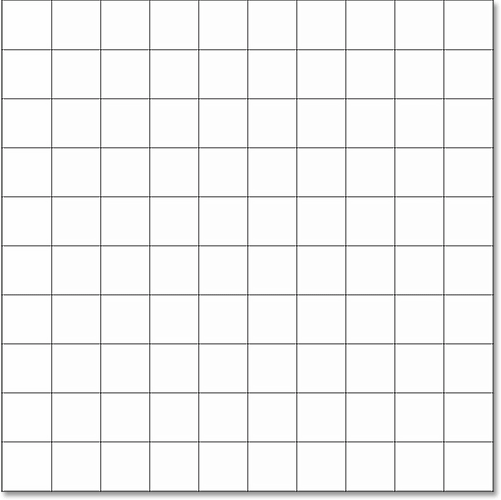
Click OK when you’re done to close out of the Preferences dialog box. You should now see a grid 10 sections wide and 10 sections tall. It’s important to note that this grid isn’t actually part of the document. It’s simply a visual guide that we’ll be using to help us make our own pixel-based grid, as we’ll be doing in a moment:
Step 4: Add A New Blank Layer And Name It “Grid”
Let’s add a new blank layer to hold the pixel-based grid we’re about to create. Press and hold the Alt (Win) / Option (Mac) key on your keyboard and click the New Layer icon at the bottom of the Layers panel:
![]()
This opens the New Layer dialog box, giving us a chance to name the new layer before it’s added. Name the layer “Grid”, then click OK to close out of the dialog box:
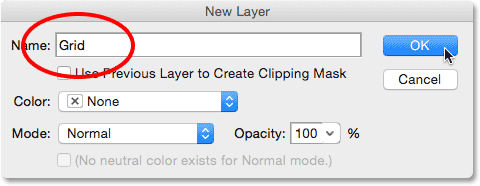
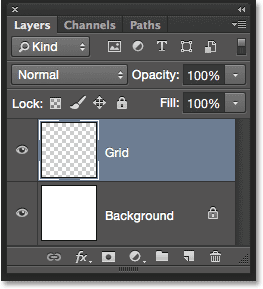
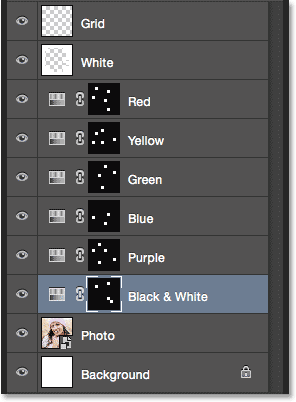
Nothing will happen in the document itself, but we can see in the Layers panel that Photoshop has added the new “Grid” layer above the Background layer:
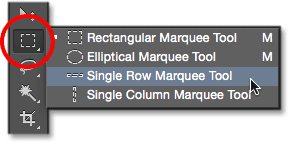
Step 5: Select The Single Row Marquee Tool
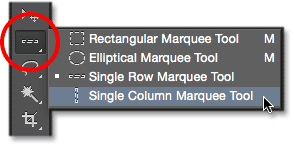
To create our grid, we’ll use two of Photoshop’s very basic and rarely-used selection tools – the Single Row Marquee Tool and the Single Column Marquee Tool. We’ll start with the Single Row Marquee Tool. By default, both of these tools are nested behind the Rectangular Marquee Tool, so click and hold on the Rectangular Marquee Tool near the top of the Tools panel until a fly-out menu appears showing you the other tools available in that same spot, then choose the Single Row Marquee Tool from the menu:
Step 6: Click On Each Horizontal Grid Line
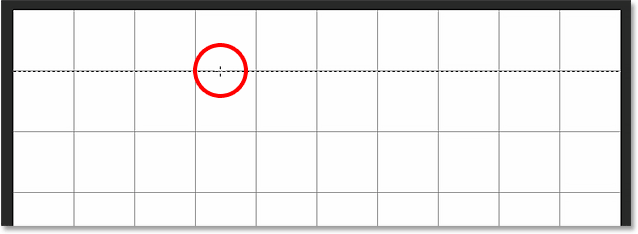
As it’s name implies, the Single Row Marquee Tool will select a single horizontal row of pixels in the document. That’s it, that’s all it does. To use it, we just need to click anywhere in the document and Photoshop will automatically select the pixel we clicked on, plus every other pixel in that row from left to right. We’re going to use the tool to convert the horizontal grid lines into a series of selection outlines. First, move your cursor directly over the top horizontal grid line, then click with your mouse. You’ll see a 1-pixel thick selection outline appear along the grid line. I’ve circled the spot where I clicked but clicking anywhere on the line will give you the exact same result. If you notice that your click wasn’t directly over the grid line, just press Ctrl+Z (Win) / Command+Z (Mac) on your keyboard to undo it and try again:
Next, we’ll add the rest of the horizontal grid lines to our selection. Press and hold the Shift key on your keyboard and click on the next grid line below it. This will select a second horizontal row of pixels, and because we had the Shift key held down, Photoshop will add this second selection to the first. Continue holding down your Shift key while clicking on the rest of the horizontal grid lines until a selection outline appears along each of them. When you’re done, you should see nine selection rows in total. Make sure you keep your Shift key held down as you click on each one, otherwise you’ll just replace the previous selection with the new one:
Step 7: Switch To The Single Column Marquee Tool
We need to do the same thing now with the vertical grid lines, which means we need to switch to the Single Column Marquee Tool. Click and hold on the Single Row Marquee Tool in the Tools panel (it will appear where the Rectangular Marquee Tool icon appeared earlier) until the fly-out menu appears, then choose the Single Column Marquee Tool from the menu:
Step 8: Click On Each Vertical Grid Line
The Single Column Marquee Tool acts the same way as the Single Row Marquee Tool, the only difference being that it selects columns of pixels (top to bottom) rather than rows, with each column being 1 pixel wide. Press and hold your Shift key and click on each of the vertical grid lines from left to right until they’re all selected. When you’re done, you should see selection outlines along every grid line, both horizontal and vertical:
Step 9: Fill The Selection With Black
We’ll create our grid by filling the horizontal and vertical selections with black. Go up to the Edit menu at the top of the screen and choose Fill:
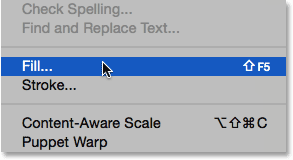
This opens Photoshop’s Fill dialog box. Set the Use option at the top to Black, then click OK:

Photoshop fills the selection with black, although it may be hard to see with the selection outlines and Photoshop’s own grid in the way. To remove the selection outlines (since we don’t need them anymore), go up to the Select menu at the top of the screen and choose Deselect:
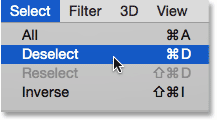
Then, to turn off Photoshop’s grid, go up to the View menu, choose Show, then once again choose Grid. A checkmark to the left of the word Grid means it’s currently turned on. Selecting it again will remove the checkmark and turn the grid off:

With the selection outlines and Photoshop’s grid removed, we can see our black grid in the document:
Step 10: Open The Photo You Want To Display In The Grid
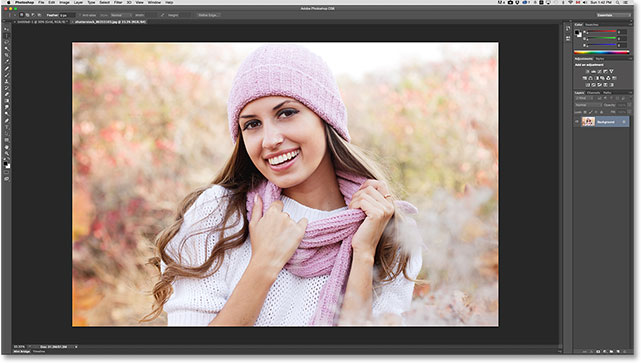
Open the photo you’ll be displaying inside the grid. The photo will open in its own tabbed document. Here’s the photo I’m using:
Step 11: Select And Copy The Photo
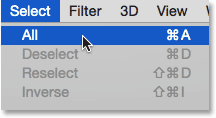
At the moment, our grid is in one document and our photo is in another. We need to move the photo into the same document as the grid. To do that, first select the photo by going up to the Select menu at the top of the screen and choosing All:
A selection outline will appear around the edges of the photo. Then, go up to the Edit menu at the top of the screen and choose Copy:
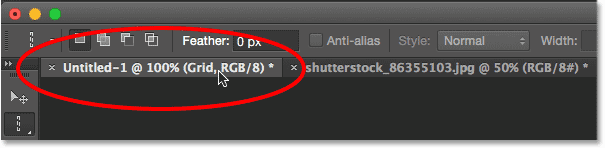
Step 12: Switch Over To The Grid Document
Switch over to the grid document by clicking on its tab just below the Options Bar at the top. In my case, the document is named simply “Untitled-1”:
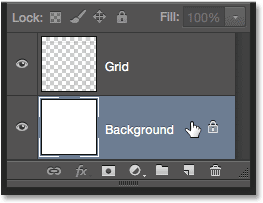
Step 13: Select The Background Layer
With the grid document open, click on the Background layer in the Layers panel to select it. This way, when we paste the photo into the document, Photoshop will place it on a new layer directly between the Background layer and the Grid layer:
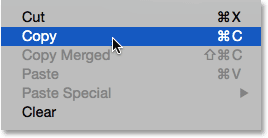
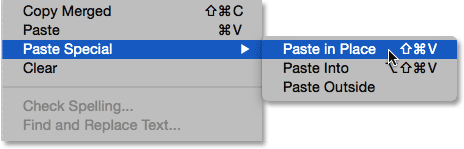
Step 14: Paste The Photo
Go up to the Edit menu, choose Paste Special, then choose Paste in Place:
Photoshop pastes and centers the photo into the grid document. In my case (and most likely yours as well) the photo will need to be resized, but we’ll fix that next:
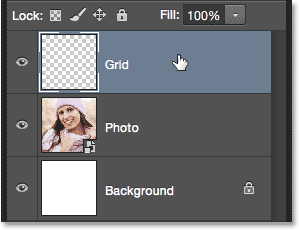
If we look in the Layers panel, we see that Photoshop has added the photo on its own layer between the Background and Grid layers, just as we planned:

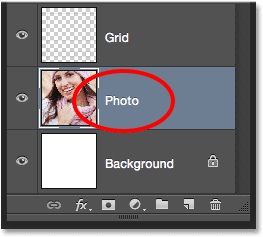
Unfortunately, Photoshop gave the new layer a generic name (“Layer 1”), so before we continue, let’s rename it. Double-click directly on its name to highlight it, then enter “Photo” as the new name. Press Enter (Win) / Return (Mac) on your keyboard when you’re done to accept the name change:
Step 15: Convert The Photo Layer Into A Smart Object
In a moment, we’ll resize the photo so it fits better within the grid, but before we do, let’s quickly convert its layer into a Smart Object. That way, if we decide to resize it again later, we won’t lose any of the photo’s image quality. With the Photo layer selected, click on the small menu icon in the upper right corner of the Layers panel:
![]()
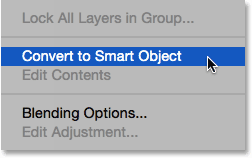
Choose Convert to Smart Object from the menu that appears:
Nothing will seem to have happened in the document, but a small Smart Object icon appears in the lower right corner of the layer’s preview thumbnail in the Layers panel. This tells us the layer is now a Smart Object:
![]()
Step 16: Resize The Photo With Free Transform
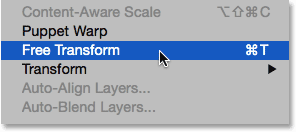
To resize the photo, we’ll use Photoshop’s Free Transform command. Go up to the Edit menu at the top of the screen and choose Free Transform:
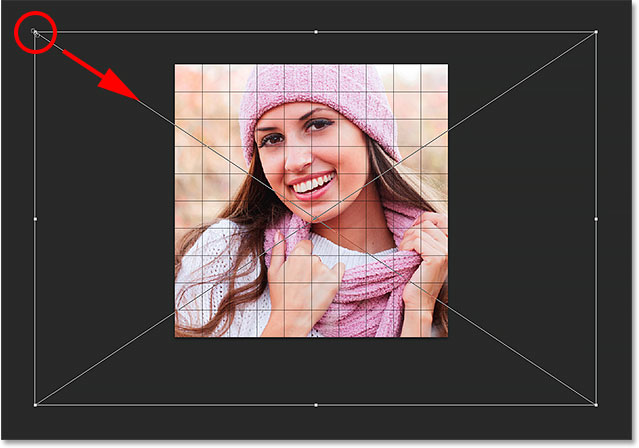
This places the Free Transform bounding box and handles around the image. If you can’t see the handles because the edges of your photo extend beyond the viewable area in the document, go up to the View menu and choose Fit on Screen:
Photoshop will instantly zoom the image out far enough so that everything, including the Free Transform handles, fits inside the viewable area of the document. To resize the photo, press and hold your Shift key, then click on any of the four corner handles and drag them. Holding the Shift key down as you drag will maintain the original aspect ratio of the image so you don’t accidentally distort the look of it. If you want to resize the photo from its center rather than from a corner, press and hold Shift+Alt (Win) / Shift+Option (Mac) as you drag any of the corner handles. If you need to move the image around inside the document, click anywhere inside the Free Transform bounding box and drag it into place. When you’re done, press Enter (Win) / Return (Mac) to accept the transformation and exit out of the Free Transform command:
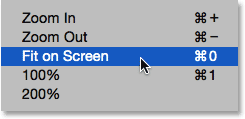
If you zoomed the image out a moment ago using the Fit on Screen command and want to zoom back in now that you’re done resizing the image, go back up to the View menu and choose 100%:
Step 17: Select The Grid Layer
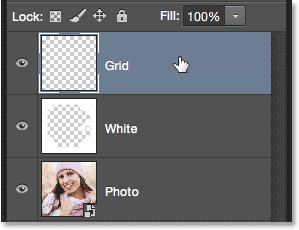
At this point, the hard work is done. We’ve created our grid, we’ve copied and pasted our photo into the grid’s document, and we’ve resized and moved the photo into position. We’re ready to have some fun colorizing the grid! First, click on the Grid layer in the Layers panel to select it:
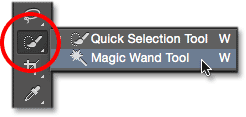
Step 18: Select The Magic Wand Tool
To colorize the grid, we need a way to select the individual squares, and we can do that easily using Photoshop’s Magic Wand Tool. By default, the Magic Wand Tool is nested behind the Quick Selection Tool in the Tools panel, so click and hold on the Quick Selection Tool until a fly-out menu appears, then choose the Magic Wand Tool from the menu:
Step 19: Select The Outer Edge Squares
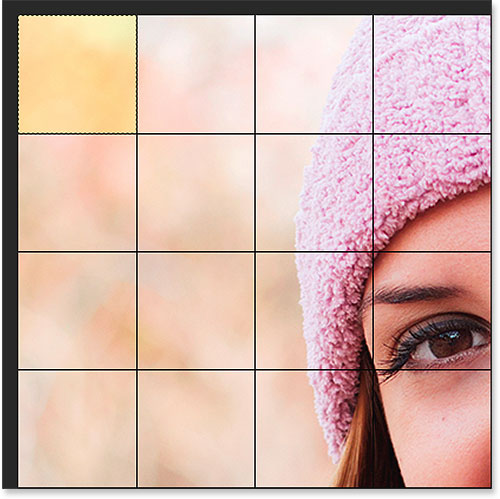
To select a square in the grid, make sure you have the Grid layer selected in the Layers panel (very important!), then simply click inside the square with the Magic Wand Tool. A selection outline will appear around the outer edges of the square. To then add additional squares to the selection, press and hold your Shift key and click inside more squares. You’ll select each new square you click inside of, and the selection will be added to the previously-selected squares. Let’s begin by selecting all the squares around the outer edge of the grid. First, click inside the square in the top left corner of the grid. A selection outline will appear around it. To make it easier to see which square I’ve selected, I’ve colorized it in yellow in the screenshot. This isn’t part of the effect; it’s just to make it easier to see which square is selected:
Next, press and hold your Shift key and continue clicking with the Magic Wand Tool inside each of the squares around the outer edges of the grid to add them all to the selection. Again, I’ve colorized the selected squares in yellow here just to make things easier to see in the screenshot. The yellow is not part of the actual effect so don’t worry that you’re not seeing it in your document:
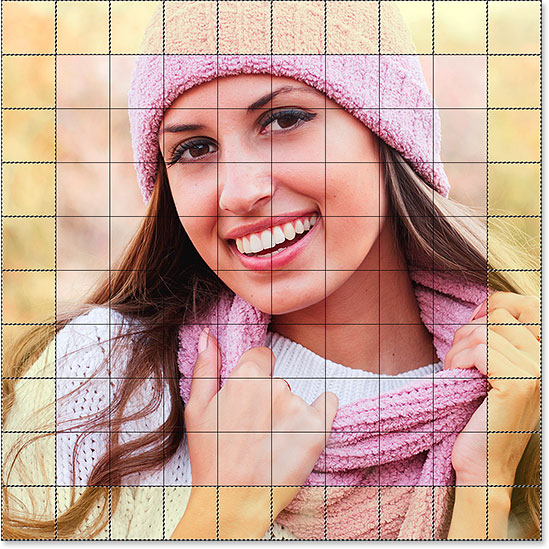
I’m going to add a few more squares to my selection as well by again pressing and holding my Shift key and clicking inside them to add them to the previously-selected squares:
Step 20: Add A New Layer Below The Grid Layer
We’ll fill these initial squares with white, which will create a border for the effect. Press and hold Ctrl+Alt (Win) / Command+Option (Mac) on your keyboard and click on the New Layer icon at the bottom of the Layers panel:
![]()
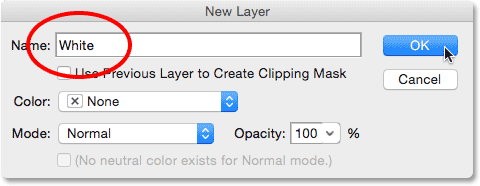
This pops open the New Layer dialog box. Name this new layer “White”, then click OK:
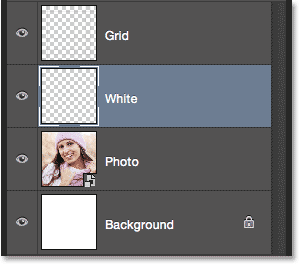
Photoshop adds a new blank layer named “White” between the Grid and Photo layers:
Step 21: Fill The Selection With White
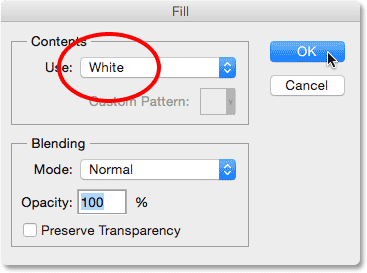
Go up to the Edit menu at the top of the screen and once again choose the Fill command. This time, when the Fill dialog box appears, change the Use option to White, then click OK:
Photoshop fills the selected squares with white. To remove the selection outline from around the squares, go up to the Select menu and choose Deselect or just press Ctrl+D (Win) / Command+D (Mac) on your keyboard:
Step 22: Select The Grid Layer Once Again
Let’s select a few different squares to colorize. First, we need have the Grid layer active in the Layers panel, so click on it to select it. Remember, you always need the Grid layer selected before you can select any squares:
Step 23: Select Different Squares
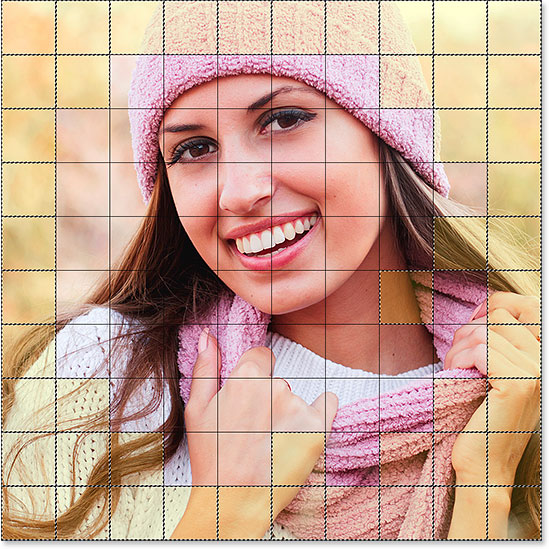
With the Grid layer once again active, press and hold your Shift key and click inside other random squares with the Magic Wand Tool to select them. If you change your mind and want to remove a square from the selection, release the Shift key and press and hold your Alt (Win) / Option (Mac) key, then click inside the square to deselect it. Here, I’ve selected a few more squares (and colored them yellow so we can see which ones I’ve selected):
Step 24: Select The Photo Layer
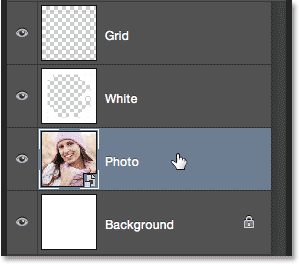
With your squares selected, click on the Photo layer (the Smart Object) in the Layers panel to select it:
Step 25: Colorize The Squares With A Hue/Adjustment Layer
We’ll colorize these squares using a Hue/Saturation adjustment layer. Click on the New Adjustment Layer icon at the bottom of the Layers panel:
![]()
Choose Hue/Saturation from the list that appears:
The controls and options for the Hue/Saturation adjustment layer will appear in Photoshop’s Properties panel. First, select the Colorize option by clicking inside its checkbox. Then, choose the color you want to colorize the selected squares with by dragging the Hue slider. For these squares, I’m actually going to leave the Hue slider set all the way to the left (its default position) which gives me red. Of course, you can choose whichever color you like. Once you’ve chosen a color with the Hue slider, you can adjust its saturation to your liking by dragging the Saturation slider left or right. For my red color, I’m going to set my Saturation value to around 50. Keep an eye on your document as you drag the sliders to preview the results:
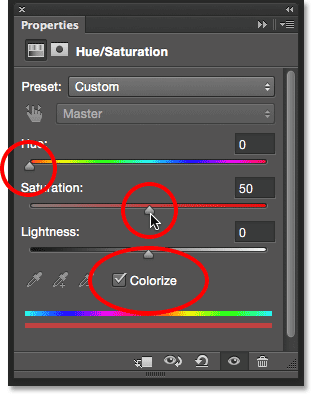
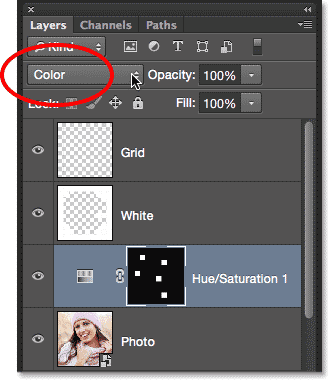
Step 26: Change The Adjustment Layer’s Blend Mode To Color
If we look in the Layers panel, we see the adjustment layer sitting directly above the Photo layer. Make sure it’s selected (highlighted in blue), then go up to the Blend Mode option at the top of the Layers panel and change its blend mode from Normal (the default mode) to Color. This allows us to change only the colors in the image, not the brightness values:
Here’s my document after colorizing the squares with red:
Step 27: Rename The Adjustment Layer
Since we’ll be using multiple Hue/Saturation adjustment layers to colorize the grid, let’s keep track of which one is being used for which color by renaming them. Since I’ve used this first Hue/Saturation layer for red, I’ll double-click on its name in the Layers panel and change its name from the generic “Hue/Saturation 1” to “Red”. Press Enter (Win) / Return (Mac) on your keyboard to accept the name change:
Step 28: Select And Colorize More Squares
Repeat steps 22-27 to select and colorize more squares. First select the Grid layer in the Layers panel, then press and hold your Shift key and click inside a few squares with the Magic Wand Tool to select them. Click on the Photo layer in the Layers panel to select it, then click on the New Adjustment Layer icon and choose Hue/Saturation. In the Properties panel, check the Colorize option, then choose a color with the Hue slider and a saturation level with the Saturation slider. Change the blend mode of the new adjustment layer to Color, then rename the adjustment layer based on the color you chose.
You can also use a Hue/Saturation adjustment layer to completely desaturate some of the squares, leaving them black and white. To do that, select some squares, then add a Hue/Saturation adjustment layer as you normally would, but rather than choosing a color with the Hue slider, simply drag the Saturation slider all the way to the left (to a value of -100), which will remove all the color:

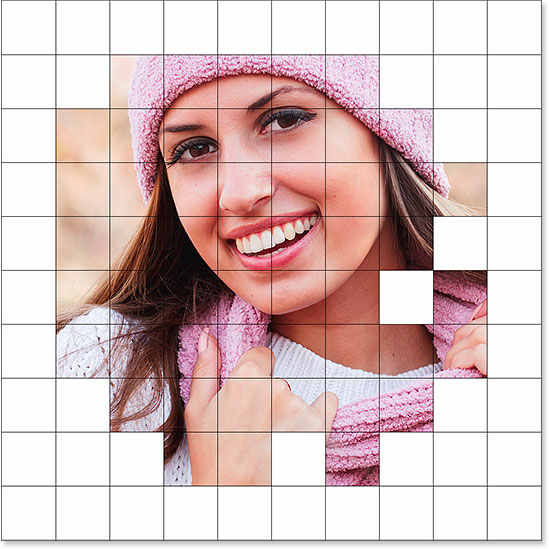
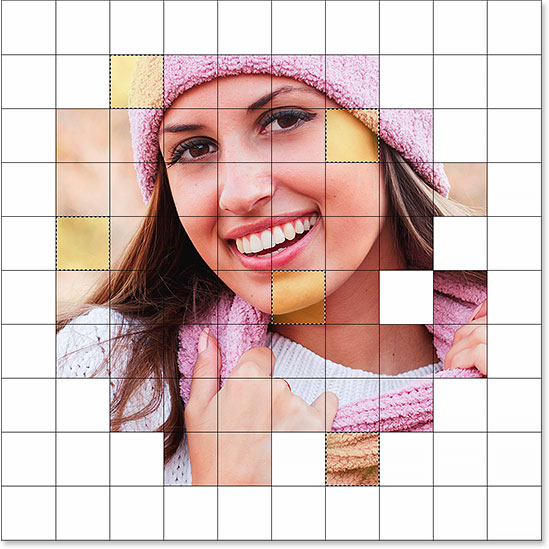
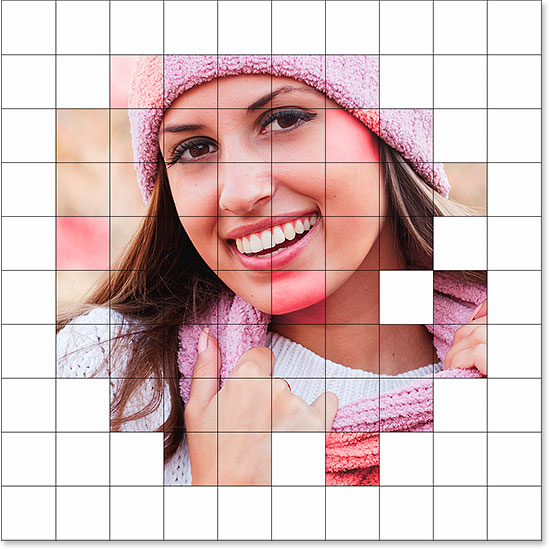
Here’s my result after selecting and colorizing more of the squares. I’ve used six Hue/Saturation adjustment layers in total — one for red (hue:0, saturation:50), yellow (hue:40, saturation:50), green (hue:120, saturation:20), blue (hue:200, saturation:20), and purple (hue:300, saturation:20), plus one for black and white (saturation:-100):
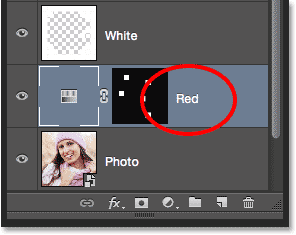
And here, we can see all six of my Hue/Saturation adjustment layers in the Layers panel, each one named according to its color:
Step 29: Change The Color Of The Grid Lines To White
Now that we’ve colorized our squares, let’s change the appearance of the grid lines themselves, first by changing their color from black to white. Click on the Grid layer in the Layers panel to select it:
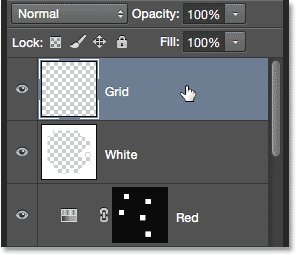
Then, click the Lock Transparent Pixels icon just below the Blend Mode option at the top of the Layers panel:
![]()
With the Lock Transparent Pixels option enabled, anything we do to the layer will affect only the grid lines themselves. It will have no effect on the transparent areas of the layer. This way, if we fill the layer with, say, white (as we’re about to do), only the grid lines will be filled with white. The transparent areas will remain transparent.
Go up to the Edit menu and once again choose Fill. When the Fill dialog box appears, the Use option should already be set to White since that’s what we set it to last time, so just click OK to close out of the dialog box:
Photoshop fills the grid lines with white:

Step 30: Add A Stroke Layer Style
If you want to increase the thickness of the grid lines, click on the Layer Styles icon (the “fx” icon) at the bottom of the Layers panel:
![]()
Choose Stroke from the list that appears:
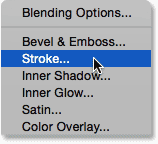
This opens Photoshop’s Layer Style dialog box set to the Stroke options in the middle column. First, let’s change the color of the stroke to white. Click on the color swatch to the right of the word Color:
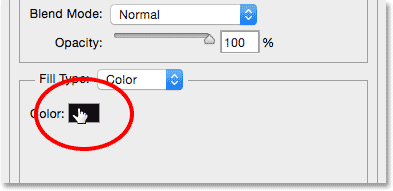
This opens the Color Picker. Choose white as the new color for the stroke, then click OK to close out of it:
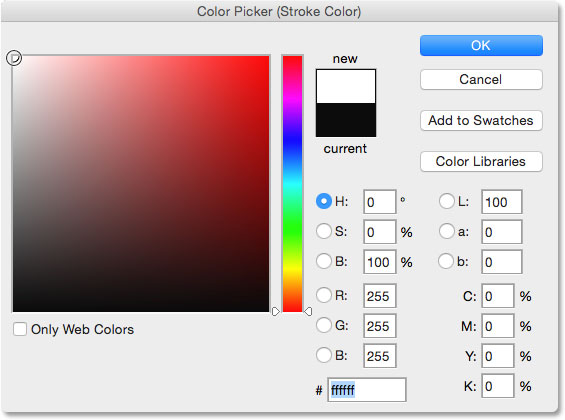
With white now as the stroke color, set the Position option to Outside, then adjust the width of the stroke by dragging the Size slider. You probably won’t want to increase the size very much. I’m going to set mine to 2 px:

Click OK when you’re done to close out of the Layer Style dialog box. Here’s my effect with the white and slightly wider grid lines:
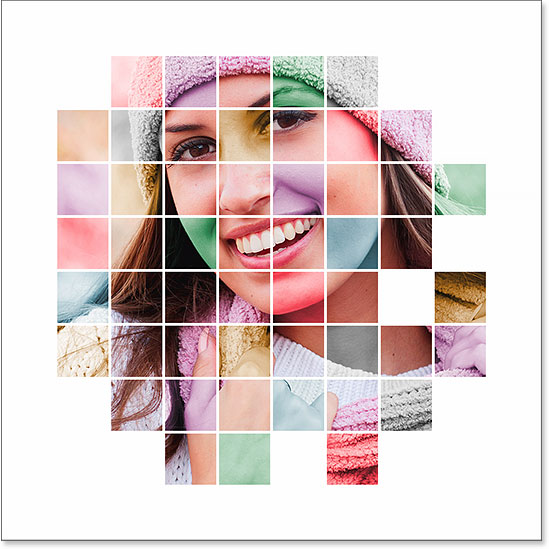
Step 31: Move And Resize The Photo Again If Needed
At this point, now that the grid design is complete, you may decide that you need to resize and/or reposition the photo. In my case, I think I’m pretty happy with the way things look, but if you do need to move or resize your photo, click on the Photo layer in the Layers panel to select it:
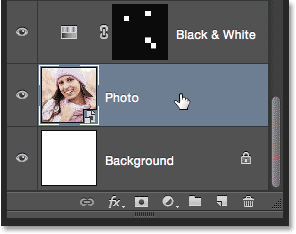
Then, simply use the same steps we covered back in Step 16 to resize and/or move the image. First, go up to the Edit menu and choose Free Transform (or press Ctrl+T (Win) / Command+T (Mac) on your keyboard) to bring up the Free Transform box and handles around the photo. If you can’t see the handles because your photo extends beyond the visible area of the document, go up to the View menu and choose Fit on Screen (or press Ctrl+0 (Win) / Command+0 (Mac) on your keyboard). Press and hold Shift while clicking and dragging any of the corner handles to resize the photo, or press and hold Shift+Alt (Win) / Shift+Option (Mac) to resize the photo from its center rather than from a corner. To move the photo, simply click and drag anywhere inside the Free Transform box. I’m going to drag my photo downward just a little bit, but I’ll leave the size the same as it was before:
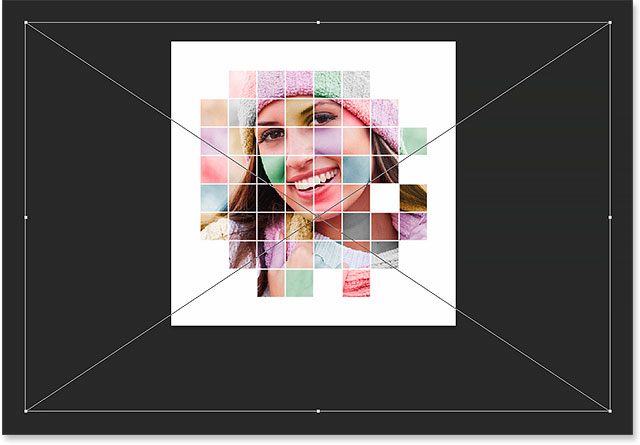
Note that because we converted the photo into a Smart Object way back in Step 15, we can safely resize it again without any loss in image quality. When you’re happy with the final size and position of your image, press Enter (Win) / Return (Mac) to accept it and close out of the Free Transform command. Then, to zoom back in on the image, go up to the View menu and choose 100% (or press Ctrl+1 (Win) / Command+1 (Mac) on your keyboard):
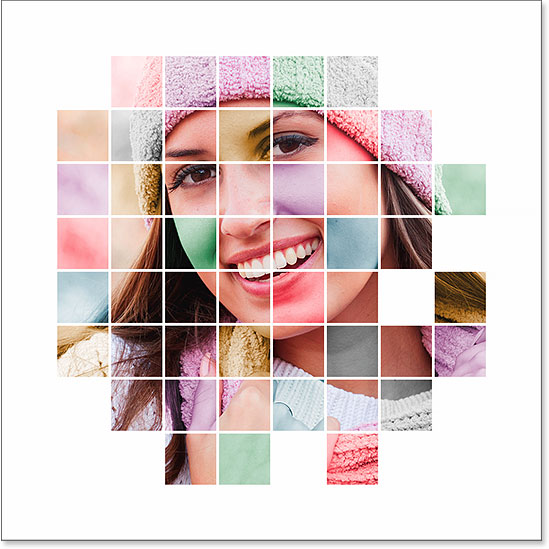
Step 32: Crop The Image (Optional)
This final step is optional, but if you want to crop away some of the white border around the grid, select Photoshop’s Crop Tool from the Tools panel:
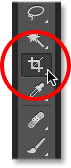
With the Crop Tool selected, set the Aspect Ratio option on the left of the Options Bar to Original Ratio:
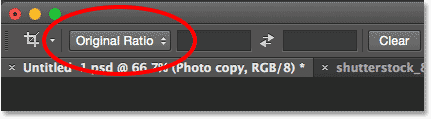
You’ll see a cropping border appear around the edges of the document, with crop marks on all four sides and in the corners. Press and hold the Alt (Win) / Option (Mac) key on your keyboard as you click and drag any of the four corner crop marks inward to crop away some of the white border:
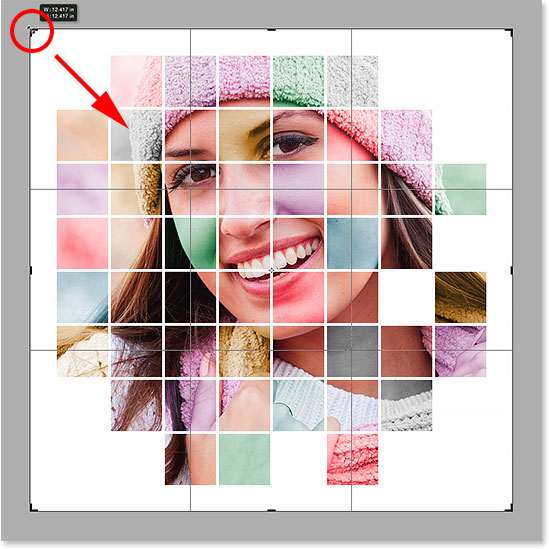
Press Enter (Win) / Return (Mac) on your keyboard to crop the image, and we’re done! Here, after cropping away some of the border, is my final result:
 Tags :- Photoshop 8 , Photoshop 7 trick , trick for Photoshop CS6 , photoshop PNG , Png Images , image png , png , transparent images , transparent png , psd , psd image , png free , download png , png for free , png blogspot , png photoshop , photoshop png images , images for photoshop , cs5 trick , photoshop tricks , photoshop tricks , photoshop background , photoshop psd , photoshop cs5, photoshop cs5 trick,
Color Grid Design In Photoshop-photoshop tutorial
Color Grid Design In Photoshop-photoshop tutorial
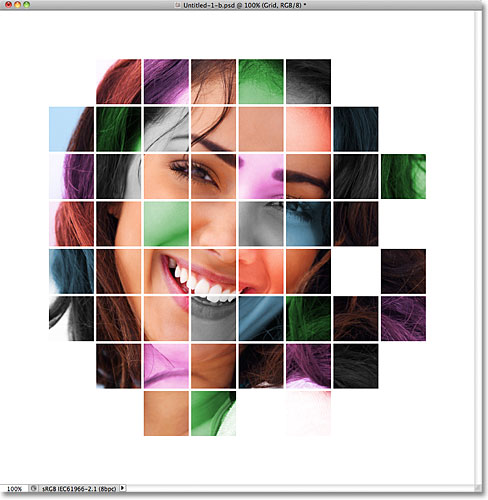
In this Photoshop Effects tutorial, we’ll learn how to create a colorized grid design! We’ll use Photoshop’s guides and rulers to set up the initial spacing, then a couple of rarely used selection tools to convert the guides into an actual grid.
We’ll learn how to easily select random squares in the grid and colorize them with adjustment layers and blend modes, and finally, how to color and adjust the appearance of the grid itself!
I’ll be using Photoshop CS5 throughout the tutorial, but any recent version will work.
Here’s the final effect we’ll be working towards:

Let’s get started!
Step 1: Create A New Photoshop Document
Let’s begin by creating a new document for the grid. Go up to the File menu in the Menu Bar along the top of the screen and choose New:
 New. Image © 2011 Photoshop Essentials.com.” width=”291″ height=”129″>
This opens Photoshop’s New Document dialog box. I’m going to create a square-shaped document by entering 1000 pixels for both the Width and Height. Of course, you can enter whatever dimensions you need, but the effect tends to work best if you stick to a square shape. For this tutorial, I’ll leave the Resolution value set to 72 pixels/inch, which is fine if you’re creating this effect for the web. If you’re planning on printing the final result, you’ll want to create a larger document and set your resolution to 240 pixels/inch or higher. Click OK when you’re done to close out of the dialog box. The new document will appear on your screen:
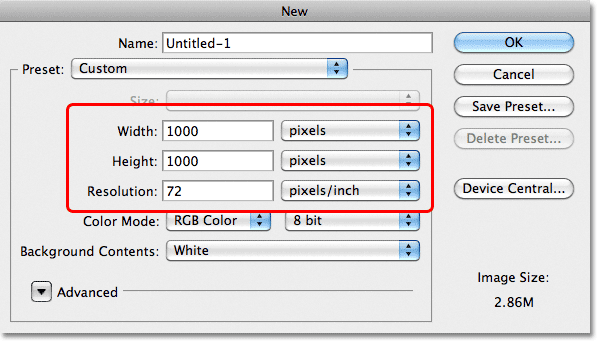
Step 2: Show Rulers
Go up to the View menu at the top of the screen and choose Rulers, or press Ctrl+R (Win) / Command+R (Mac) to quickly turn the rulers on with the keyboard shortcut:
Step 3: Change The Ruler Measurement Type To Percent
This displays Photoshop’s rulers along the top and left of the document. Depending on what measurement type your rulers are set to in Photoshop’s Preferences, they’re probably displaying either pixels or inches. Move your mouse cursor into the rulers, either along the top or the left, then Right-click (Win) / Control-click (Mac) inside the rulers and choose Percent from the list. You’ll see the rulers change to percentage increments:
Step 4: Drag Out Horizontal And Vertical Guides At 10 Percent Increments
The reason we turned the rulers on was so that we could easily add equally-spaced guides to our document, which will then become our grid lines. Let’s add vertical guides first. Click inside the ruler along the left of the document, and with your mouse button held down, drag out the first guide. Use the top ruler to place the guide at the 10% mark (release your mouse button to place the guide):
Do the same thing to add a guide at each 10% increment (20%, 30%, 40%, and so on), all the way up to the 90% mark. Your document should now appear divided into 10 equally-spaced vertical columns:

Next, use the same steps to add horizontal guides. Click inside the top ruler and with your mouse button held down, drag out a horizontal guide. Use the left ruler to place the guide at the 10% mark. Continue dragging out horizontal guides at 10% increments (20%, 30%, 40%, just like before) all the way down to the 90% mark. When you’re finished, you should have the same number of horizontal and vertical guides dividing the document up into a grid of squares:
With the guides in place, press Ctrl+R (Win) / Command+R (Mac) on your keyboard to hide the rulers, since we no longer need them.
Step 5: Add A New Blank Layer And Name It “Grid”
Hold down your Alt (Win) / Option (Mac) key and click on the New Layer icon at the bottom of the Layers panel:
![]()
Normally, Photoshop would just go ahead and add a new blank layer, but by holding down Alt (Win) / Option (Mac) when clicking the New Layer icon, we tell it to first pop open the New Layer dialog box, which gives us the chance the name the new layer before it’s added. Name the layer “Grid”, then click OK:

The new blank layer appears in the Layers panel above the Background layer:
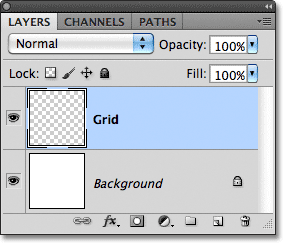
Step 6: Create A Selection From The Guides
We’ve divided our document up into a grid using Photoshop’s guides, but the guides are just for visual reference. They won’t be of any real use to us unless we somehow convert them into an actual pixel-based grid, and we can do that easily using a couple of Photoshop’s rarely used selection tools – The Single Row and Single Column Marquee Tools.
Click on the Rectangular Marquee Tool near the top of the Tools panel and hold your mouse button down for a second or two until a small fly-out menu appears showing you the other tools nested in behind in, then choose the Single Row Marquee Tool from the list:
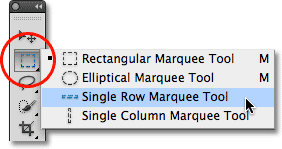
As it’s name implies, the Single Row Marquee Tool will select a single horizontal row of pixels in the document. To use the tool, we just need to click anywhere in the document and Photoshop will automatically select the pixel we clicked on, plus every other pixel in that row from left to right. We’re going to use the tool to convert the horizontal grid lines into a series of selection outlines. First, move your cursor directly over the top horizontal grid line (the one you placed at the 10% mark) and click. You’ll see a 1-pixel thick selection outline appear along the guide:
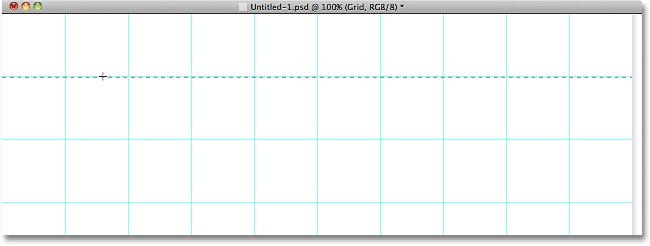
Hold down your Shift key and click on the next horizontal guide below it. This will add a second selection outline to the document. Continue holding down your Shift key and clicking on all the horizontal guides until a selection outline appears along each of them. You should see 9 selection outline rows in total. Make sure you keep your Shift key held down as you click on each new guide, otherwise you’ll just replace the previous selection outline with the new one:
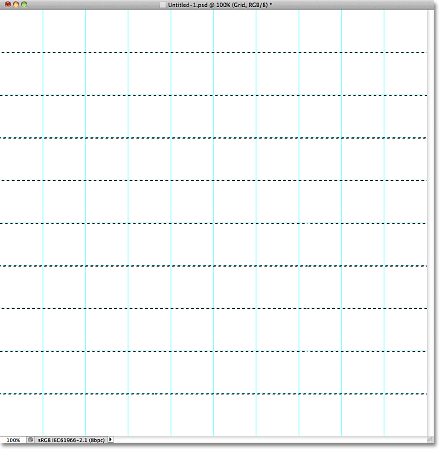
We need to do the same thing now with the vertical guides, which means we need to switch to the Single Column Marquee Tool. Click on the Single Row Marquee Tool in the Tools panel (it will appear where the Rectangular Marquee Tool icon appeared earlier) and hold your mouse button down until the fly-out menu appears, then choose the Single Column Marquee Tool from the list:
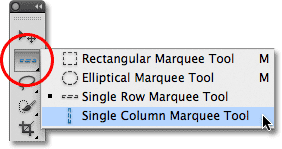
We want our vertical selection outlines to be added to the horizontal selection outlines we already have, so once again hold down your Shift key, then click on each of the vertical guides in the document until they’re all selected. When you’re done, you should have selection outlines along every guide, horizontally and vertically:
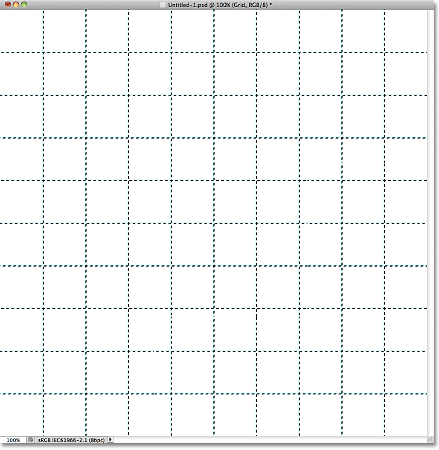
Step 7: Fill The Selection With Black
Go up to the Edit menu at the top of the screen and choose Fill:
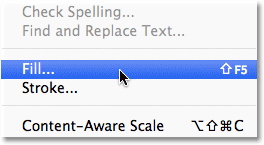
When the Fill dialog box appears, set the Use option at the top to Black, then click OK to close out of the dialog box:
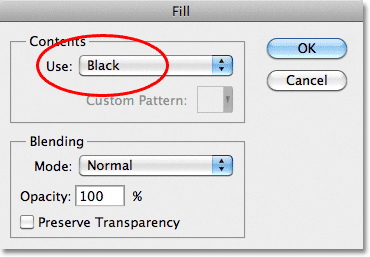
This fills the selections with black, although it may be hard to see with the guides and selection outlines in the way, so go up to the Select menu at the top of the screen and choose Deselect, which will remove the selection outlines:
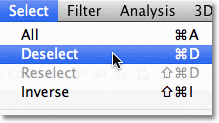
Then, to turn off the guides, go up to the View menu, choose Show, and then choose Guides. At first, you’ll see a checkmark to the left of the word Guides which tells us the guides are currently visible. Clicking Guides will remove the checkmark and turn the guides off:
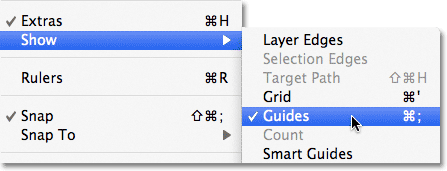
With the selection outlines and guides removed, we can see our black grid on the Grid layer:
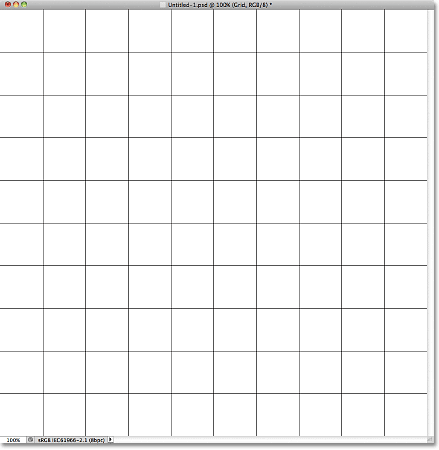
Step 8: Open The Photo You Want To Use With The Effect
Open the photo you’ll be using with the grid effect. Here’s my image:
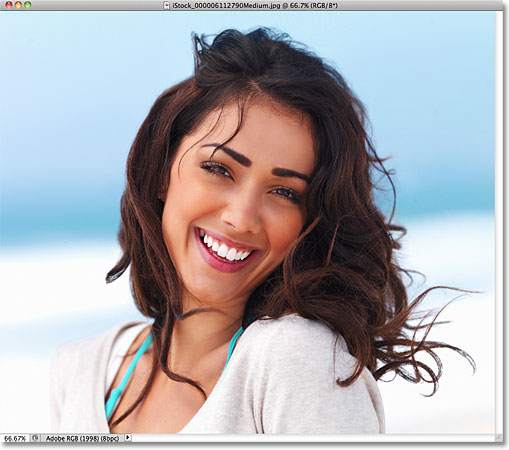
If you’re using Photoshop CS3 or earlier, the photo will automatically open in its own floating document window. If you’re using Photoshop CS4 or CS5, depending on how you have things set up in Photoshop’s Preferences, the photo may open in a tabbed document. If that’s the case, to make the next step easier, go up to the Window menu at the top of the screen, choose Arrange, and then choose Float All in Windows (CS4 and CS5 only):
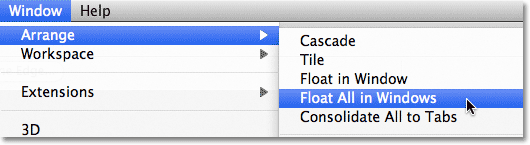
Step 9: Drag The Photo Into The Grid Document
Click anywhere inside the grid’s document window to make it active, then click on the Background layer in the Layers panel to select it. This way, when we drag the photo into the document, as we’ll be doing in a moment, the photo will appear on its own layer between the Background and Grid layers:
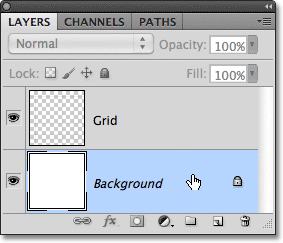
Now click anywhere inside the photo’s document window to make it active and select the Move Tool from the Tools panel:
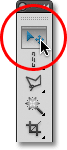
Hold down your Shift key, then click with the Move Tool inside the photo’s document window and drag the photo into the grid’s document window:
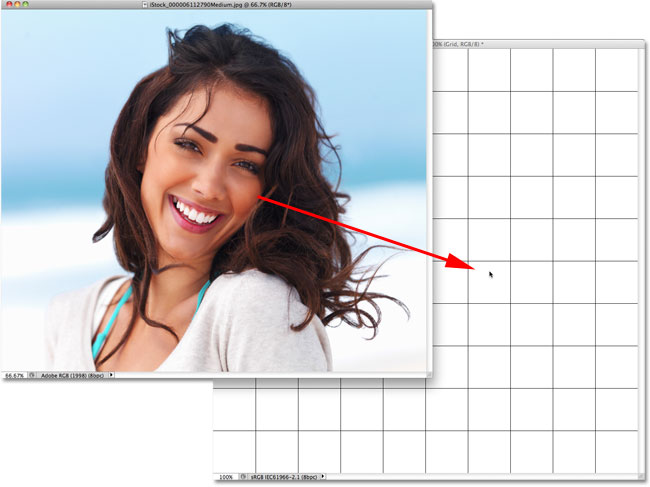
Release your mouse button, then release your Shift key, and the photo will appear centered inside the grid’s document window. You can close out of the photo’s document at this point since we no longer need it:
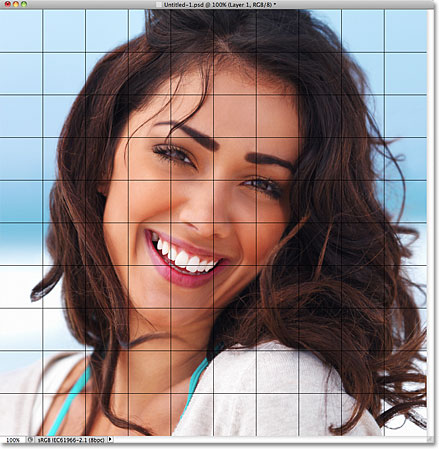
Notice that the grid appears in front of the photo. That’s because, if we look in the Layers panel, we see that the photo has been placed on its own layer under the Grid layer, just as we wanted:
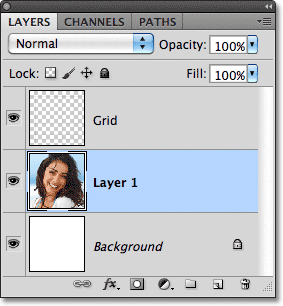
Step 10: Resize The Photo If Needed With Free Transform
If you need to resize your photo inside the grid document, go up to the Edit menu at the top of the screen and choose Free Transform:
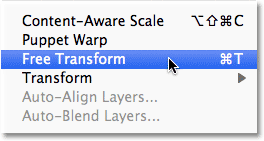
This places the Free Transform bounding box and handles around the image. If you can’t see the handles because the edges of your photo extend beyond the viewable area in the document window, go up to the View menu and choose Fit on Screen:
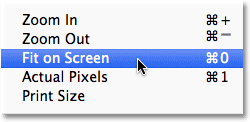
Photoshop will instantly zoom the image out far enough so that everything, including the Free Transform handles, fits inside the document window. To resize the photo, hold down your Shift key, then click on any of the four corner handles and drag them. Holding the Shift key down as you drag will maintain the original aspect ratio of the image so you don’t accidentally distort the look of it. If you want to resize the photo from its center rather than from a corner, hold Shift+Alt (Win) / Shift+Option (Mac) as you drag any of the corner handles. If you need to move the image around inside the document, simply click anywhere inside the Free Transform bounding box and drag it into place. When you’re done, press Enter (Win) / Return (Mac) to accept the change and exit out of the Free Transform command:
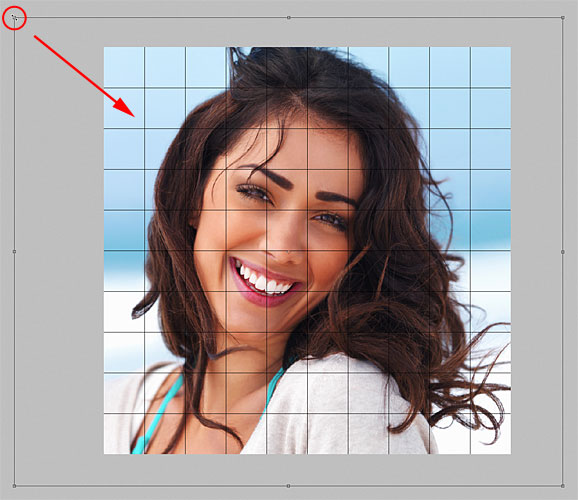
If you zoomed the image out a moment ago using the Fit on Screen command and want to zoom back in now that you’re done resizing the image, go back up to the View menu and choose Actual Pixels (see our Zooming and Panning in Photoshop tutorial for more info on zooming in and out of documents):
![]() Actual Pixels command. Image © 2011 Photoshop Essentials.com.” width=”250″ height=”122″>
Actual Pixels command. Image © 2011 Photoshop Essentials.com.” width=”250″ height=”122″>
Step 11: Select The Grid Layer
At this point, all the initial hard work is done. We’ve created our grid, we’ve dragged our photo into the grid’s document, and we’ve resized and moved the photo into position. We’re ready to have some fun colorizing the grid! First, we need to select the Grid layer, so click on it in the Layers panel to select it:
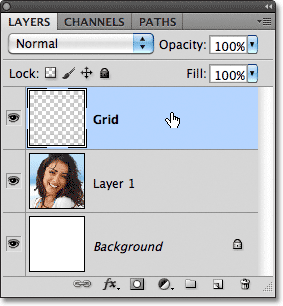
Step 12: Select The Magic Wand Tool
To colorize the grid, we need a way to select the individual squares, and we can do that using Photoshop’s Magic Wand Tool. Select it from the Tools panel. If you’re using Photoshop CS2 or earlier, you can simply click on the Magic Wand’s icon. For Photoshop CS3 and higher, click on the Quick Selection Tool, then hold your mouse button down until a fly-out menu appears and choose the Magic Wand from the menu:
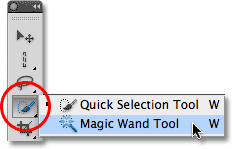
Step 13: Select The Outer Edge Squares
To select a square in the grid, make sure you have the Grid layer selected in the Layers panel, then simply click inside the square with the Magic Wand. A selection outline will appear around the outer edges of the square. To then add additional squares to the selection, hold down your Shift key and click inside the squares you want. Each new square you click inside of will become selected and added to the previously selected squares. Let’s begin by selecting all the squares around the outer edge of the grid. First, click inside the square in the top left corner of the grid. A selection outline will appear around it:

Hold down your Shift key and continue clicking inside each of the squares around the outer edges of the grid to add them all to the selection:

I’m going to add a few more squares to my selection as well by again holding down my Shift key and clicking inside them to add them to the previously selected squares. To make it easier to see which squares I’ve selected, I’ve colorized them in yellow (this isn’t part of the effect, it’s just to make it easier to see the squares I’ve selected in the screenshot):
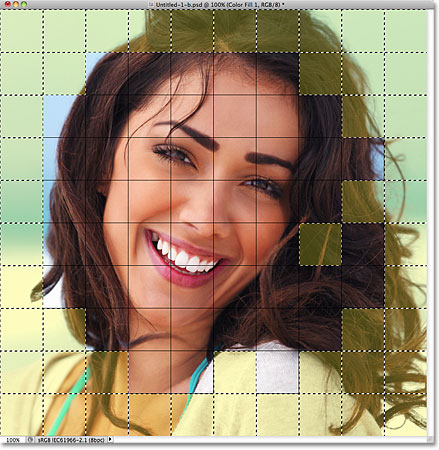
Step 14: Add A New Layer Below The Grid Layer
We’ll fill these initial squares with white, which will create a border for the effect. Hold down your Ctrl (Win) / Command (Mac) key and click on the New Layer icon at the bottom of the Layers panel:
![]()
Normally, Photoshop adds new layers directly above the currently selected layer, but by holding the Ctrl (Win) / Command (Mac) key when clicking the New Layer icon, the layer is added below the currently selected layer. We can see in the Layers panel that we now have a new blank layer between the photo on Layer 1 and the Grid layer:
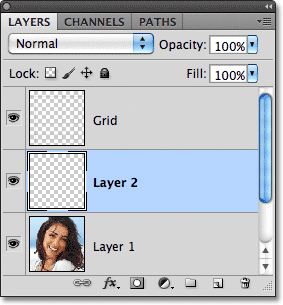
Step 15: Fill The Selected Squares With White
Go up to the Edit menu at the top of the screen and once again choose the Fill command. This time, when the Fill dialog box appears, change the Use option to White. Click OK when you’re done:
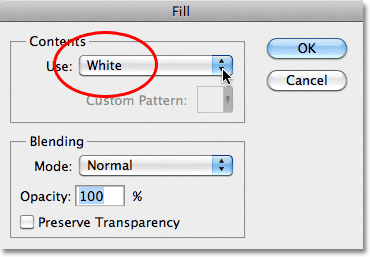
Photoshop fills the selected squares with white. Deselect the squares by going up to the Select menu and choosing Deselect, or simply press Ctrl+D (Win) / Command+D (Mac) to deselect them with the keyboard shortcut:

Step 16: Select The Grid Layer
Let’s select a few different squares to colorize. First, we need have the Grid layer active in the Layers panel, so click on it to select it. Remember, you always need the Grid layer selected before you can select any squares:
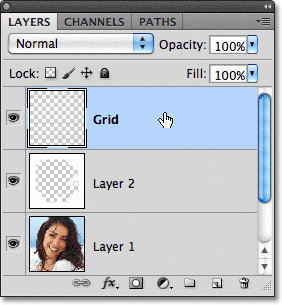
Step 17: Select Different Squares
With the Grid layer now active, click inside an initial square to select it, then hold down your Shift key and click inside other squares to add them to the previously selected square(s). If you change your mind and want to remove a square from the selection, hold down your Alt (Win) / Option (Mac) key and click inside the square to deselect it. Here once again, I’ve highlighted the squares I’ve selected in yellow just to make them easier to see in the screenshot:
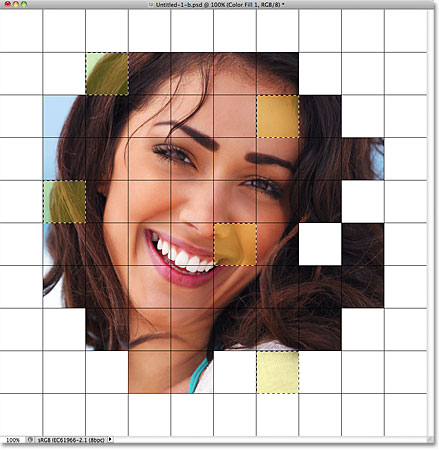
Step 18: Select The Photo Layer
Click on the photo’s layer (Layer 1) in the Layers panel to select it:
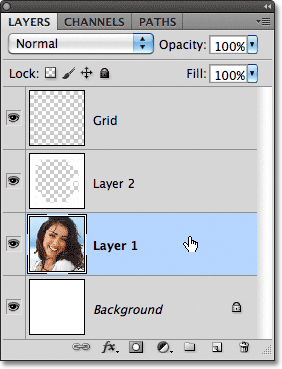
Step 19: Colorize The Squares With A Hue/Saturation Adjustment Layer
Click on the New Adjustment Layer icon at the bottom of the Layers panel:
![]()
Choose Hue/Saturation from the list of adjustment layers that appears:
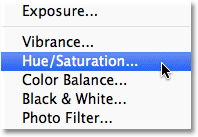
If you’re using Photoshop CS4 or CS5, the controls and options for the Hue/Saturation adjustment layer will appear inside the Adjustments Panel. In CS3 and earlier, a separate Hue/Saturation dialog box will open. First, select the Colorize option by clicking inside its checkbox. Then, choose the color you want to colorize the selected squares with by dragging the Hue slider. For these squares, I’m going to leave the Hue slider set all the way to the left (its default position) which selects red. Of course, you can choose whichever color you like. To increase the color’s saturation, drag the Saturation slider towards the right. I’m going to set my Saturation value to 55. Keep an eye on your document as you drag the sliders to preview the results. For Photoshop CS3 and earlier users, click OK when you’re done to close out of the dialog box:
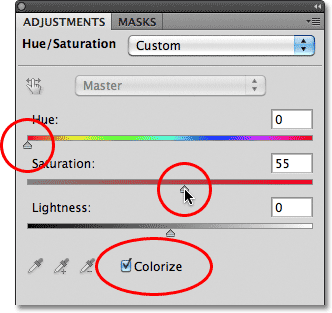
Step 20: Change The Blend Mode For The Adjustment Layer To Color
If we look in the Layers panel, we see the adjustment layer sitting directly above the photo layer. Make sure it’s selected (highlighted in blue), then go up to the Blend Mode option at the top of the Layers panel and change its blend mode from Normal (the default mode) to Color. This makes sure we’re changing only the colors in the image, not the brightness values:
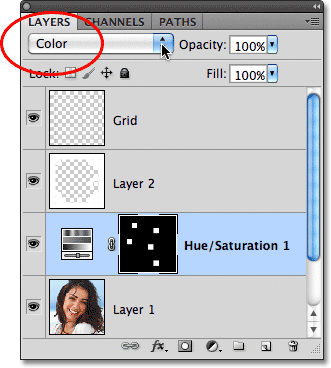
Here’s my document after colorizing some of the squares red:
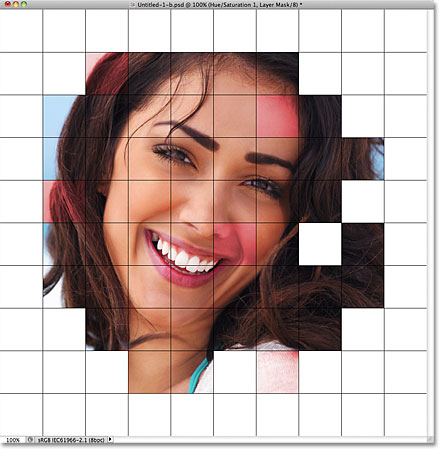
Step 21: Select And Colorize More Squares
Repeat steps 16-20 to select and colorize more squares. First select the Grid layer in the Layers panel, then click inside a square to select it with the Magic Wand. Hold Shift and click inside more squares to add them to the selection. Click on the photo layer in the Layers panel to select it, then click on the New Adjustment Layer icon and choose Hue/Saturation. Select the Colorize option, then choose a color with the Hue slider and a saturation level with the Saturation slider. Click OK to close out of the dialog box (CS3 and earlier). Finally, change the blend mode of the new adjustment layer to Color.
You can also use a Hue/Saturation adjustment layer to completely desaturate some of the squares, leaving them black and white. To do that, select some squares, then add a Hue/Saturation adjustment layer as you normally would, but rather than choosing a color with the Hue slider, simply drag the Saturation slider all the way to the left, which will remove all the color (no need to select the Colorize option, either):
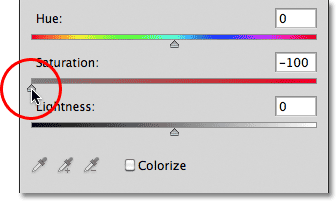
Here’s my effect so far after colorizing more squares with additional Hue/Saturation adjustment layers. In case you want to use the same colors I did, for blue I set Hue to 200, Saturation to 30. For Green, Hue was set to 120, Saturation 25. For Purple, Hue was 289, Saturation 35. And as I just mentioned, for the black and white squares, Saturation was set to -100 by dragging the slider all the way to the left:
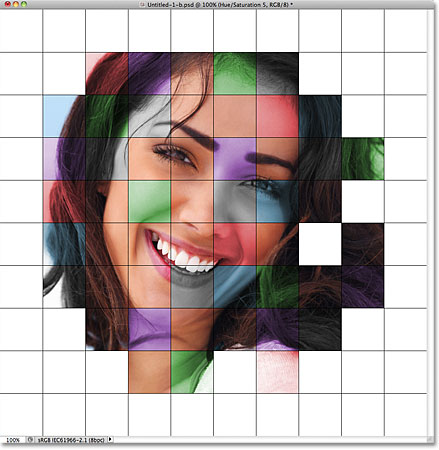
Step 22: Try A Different Color Mode For Some Of The Adjustment Layers
The one problem I have with my result so far is that it doesn’t really look as bright and colorful as I was hoping for. One way to change that is to change the blend mode for some of the adjustment layers. If we look in the Layers panel, we can see all the adjustment layers I’ve used to colorize the squares. There’s five in total, including the one I used for the black and white effect:
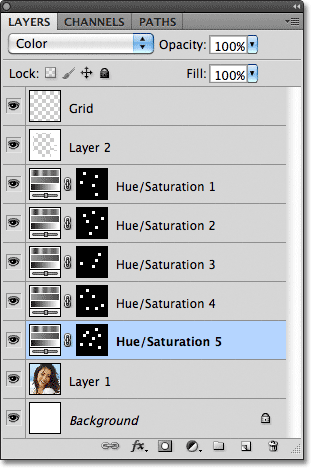
To add more interest to the image, try changing the blend mode for some of the adjustment layers to something other than Color. To do that, just click on the adjustment layer in the Layers panel to select it, then change the blend mode at the top of the Layers panel. For example, I think the red color in my image is looking a little dull, so I’ll click on the top Hue/Saturation adjustment layer in the Layers panel to select it (since it’s the one I used to add red), then I’ll change its blend mode from Color to Screen:
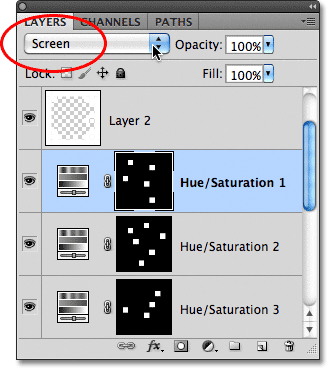
The Screen blend mode makes things brighter but also tends to reduce color saturation, so to compensate, with the red Hue/Saturation adjustment layer selected, I’ll go back to the Adjustments Panel and increase the Saturation value for red to 70 (for Photoshop CS3 and earlier users, click on the adjustment layer’s thumbnail in the Layers panel to re-open the Hue/Saturation dialog box to make any changes, then click OK to close out of the dialog box):
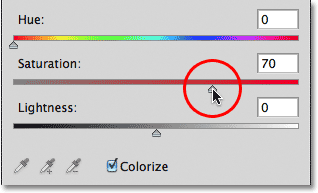
Here’s my image after changing the blend mode for red to Screen and increasing its color saturation. Notice the red squares now look brighter:
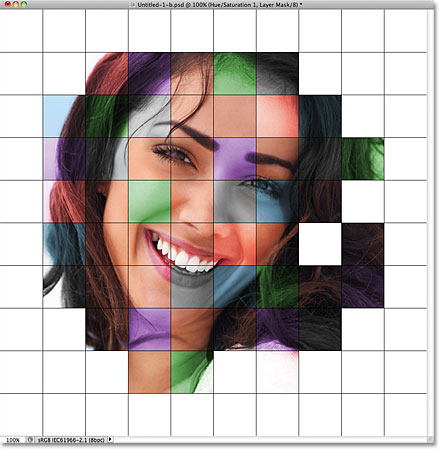
I’ll do the same thing with the purple Hue/Saturation adjustment layer, first clicking on it to select it in the Layers panel, then changing its blend mode to Screen and increasing its color saturation to 55 in the Adjustments Panel (or dialog box in CS3 and earlier). Other blend modes that can give you good results include Multiply (for a darker color), as well as Overlay which will give you a higher contrast effect but may also change the appearance of the color itself. Here’s my effect now with the red and purple squares set to the Screen blend mode:
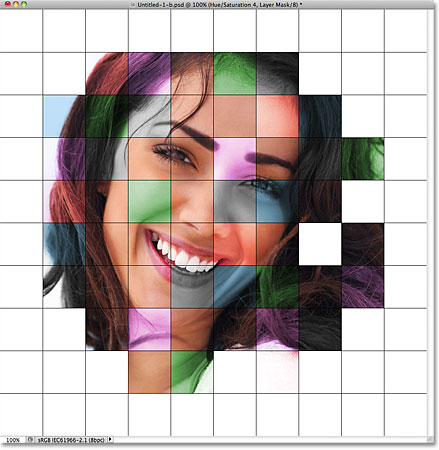
Step 23: Change The Color Of The Grid Lines To White
As a final step for the effect, lets change the appearance of the grid lines themselves, first by changing their color from black to white. Click on the Grid layer in the Layers panel to select it, then click on the Lock Transparent Pixels icon just below the blend mode option (it’s the first of four icons in a row):
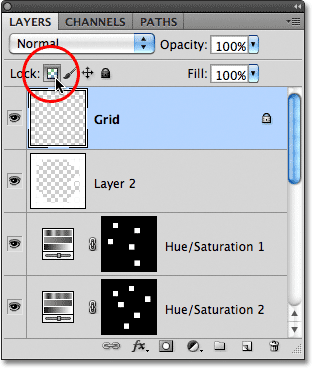
Step 24: Fill The Grid Lines With White
With the Lock Transparent Pixels option selected on the Grid layer, anything we do to the layer will affect only the pixels themselves. It will not have any affect on the transparent areas. This way, if we fill the layer with, say, white (as we’re about to do), only the grid lines will be filled with white. The transparent areas on the layer will remain transparent.
Go up to the Edit menu and once again choose Fill. When the Fill dialog box appears, the Use option should already be set to White since that’s what we set it to last time, so just click OK to close out of the dialog box. Photoshop will fill the grid lines with white:
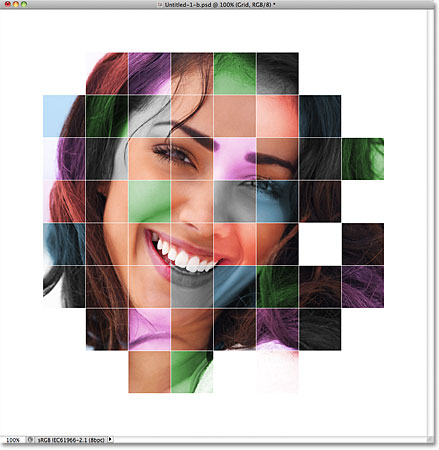
Step 25: Add A Stroke Layer Style
If you want to increase the thickness of the grid lines, click on the Layer Styles icon at the bottom of the Layers panel:
![]()
Choose Stroke from the list of layer styles that appears:
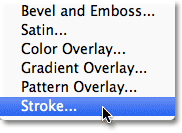
This opens Photoshop’s Layer Style dialog box set to the Stroke options in the middle column. Click on the color swatch beside the word Color, which opens the Color Picker. Choose white from the Color Picker, then click OK to close out of it. With white now as the stroke color, leave the Position set to Outside and adjust the width of the stroke by dragging the Size slider while keeping an eye on the document to judge the result. I’m going to set my stroke’s size to 2 px (pixels):
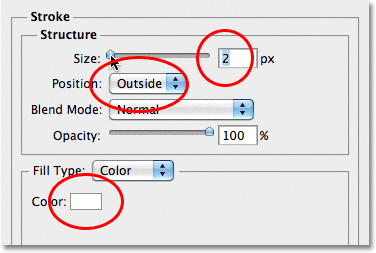
Click OK to close out of the Layer Style dialog box, and we’re done! Here is my final color grid effect:
Tags :- Photoshop 8 , Photoshop 7 trick , trick for Photoshop CS6 , photoshop PNG , Png Images , image png , png , transparent images , transparent png , psd , psd image , png free , download png , png for free , png blogspot , png photoshop , photoshop png images , images for photoshop , cs5 trick , photoshop tricks , photoshop tricks , photoshop background , photoshop psd , photoshop cs5, photoshop cs5 trick,
Collage Of Warped Photos – Photoshop Tutorial
Collage Of Warped Photos – Photoshop Tutorial – Photoshop Tutorial | Photoshop tutorials
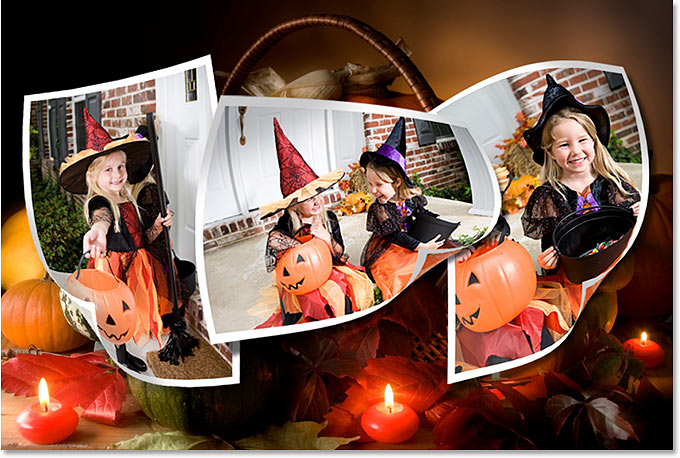
In this Photoshop effects tutorial, we’re going to learn how to create a collage of “warped” photos. Now, don’t go letting your imagination run wild here. When I say “warped”, I don’t mean “sick, twisted and shocking”, unless of course those are the types of photos you want to use. What I’m talking about is photos that we’ll be bending, curling, distorting and reshaping using Photoshop’s Warp Tool.
I should point out here that the Warp Tool (not to be confused with the Text Warp tool) has only been around since Photoshop CS2, which means you’ll need Photoshop CS2 or later if you want to follow along using the same techniques I’ll be using in this tutorial. There are more complicated and time-consuming ways to create the same effect in older versions of Photoshop, but the Warp Tool makes things incredibly easy for us and is also really fun to use, as we’ll see!
For this tutorial, I’ll be using three photos in my collage, plus the image I’ll be using as the background, for a grand total of four photos (who says math isn’t easy?). You, of course, can use as many photos as you like. Since Halloween is fast approaching (at the time I’m writing this), I thought I’d go with a Halloween theme for my collage, but again you can use whichever photos you like.
Here’s the final effect we’ll be working towards:
Let’s get started!
Step 1: Open The First Photo You Want To Add To Your Collage
Open the first photo you want to add to your collage. We’ll go through all the steps necessary to complete our work on this first photo, and then it’s simply a matter of repeating the steps with each additional photo you want to add to your collage.
Here’s the first photo I’ll be using:
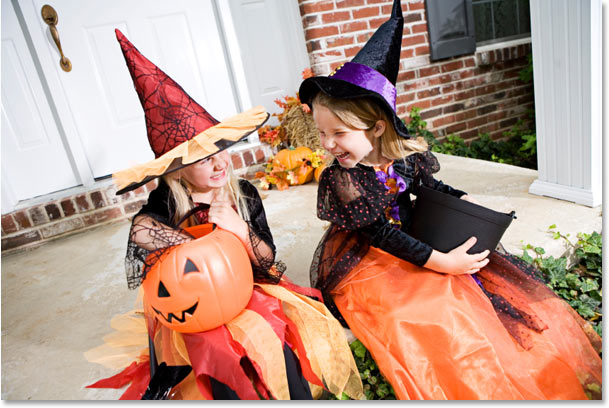
Step 2: Rename The Background Layer
With the photo newly opened inside Photoshop, if we look over in the Layers palette, we can see that we currently have one layer, named Background, which contains our image:
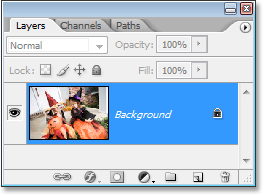
We need to add a new blank layer below this Background layer, but there’s a small problem. Photoshop treats the Background layer differently from all other layers (which is why the name is written in italics). There’s things we can do with other layers that we can’t do with the Background layer. One of the things we can’t do is add any layers below it. The Background layer must always remain the bottom layer in the Layers palette. Fortunately, there’s an easy way around this problem. All we need to do is rename the layer to something other than “Background”, and the easiest way to do that is by holding down your Alt (Win) / Option (Mac) key and double-clicking directly on the word “Background”. Photoshop will automatically rename the layer “Layer 0”:
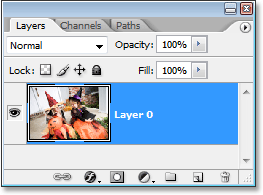
Step 3: Add A New Blank Layer Below “Layer 0”
Now that our Background layer is no longer named “Background”, we can add a layer below it. To do that, hold down your Ctrl (Win) / Command (Mac) key and click on the New Layer icon at the bottom of the Layers palette:
![]()
Clicking the “New Layer” icon adds a new blank layer, and by default, Photoshop places new layers above the layer we currently have selected in the Layers palette, but by holding down “Ctrl/Command” as we click on the icon, we tell Photoshop to place the new layer below the currently selected layer. As we can see now in our Layers palette, the new layer, which Photoshop has automatically named “Layer 1”, appears below “Layer 0”:
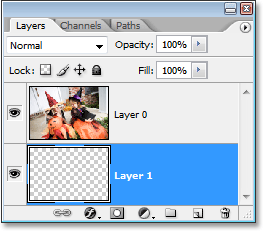
Step 4: Add Additional Canvas Space Around The Image
Since we’re going to be bending and warping our image, we need to give ourselves a little extra room to work, which means we need to add some extra canvas space around the image. To do that, go up to the Image menu at the top of the screen and choose Canvas Size. This brings up the Canvas Size dialog box. Enter 150 for the Width and Height and change the measurement type for both to percent. Make sure the Relative option is not checked, and make sure the middle square is selected in the Anchor grid:
Click OK when you’re done, and Photoshop will add the extra canvas space all around the image, giving us lots of room to work:
Step 5: Add A White Stroke To The Image
Click on “Layer 0” in the Layers palette to select the layer that contains the original image. Let’s add a white photo border around the edge of the image. To do that, go up to the Edit menu at the top of the screen and choose Stroke. This brings up the Stroke dialog box. I’m going to enter a value of 20 px (pixels) for my Width, which works well with my image here. You may need to enter a different value depending on the size of the image you’re using. I’m using a low resolution image for this tutorial, so if you’re using a high resolution image, you’ll need to try a higher width value. The goal here is to simply add what looks like a standard white photo border around the image, which means we also need to select white as our stroke color, so click on the color swatch to the right of the word Color, which brings up Photoshop’s Color Picker and choose white.
Finally, set the Location option in the middle of the dialog box to Inside so the stroke appears inside the edge of the image:
Click OK to exit out of the dialog box and apply the white stroke:
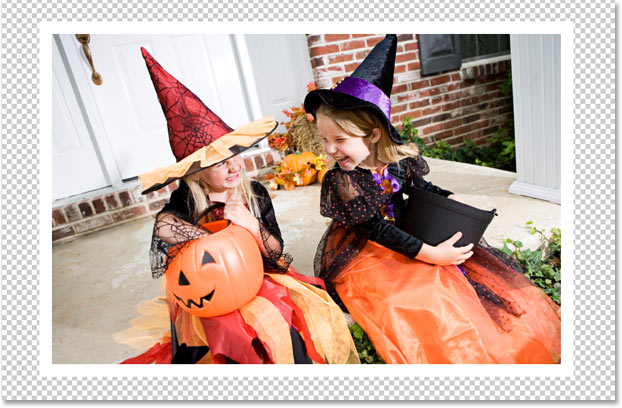
Step 6: Warp The Image With Photoshop’s Warp Tool
Here’s where we get to the fun part. We’re going to bend, twist and curl the image using Photoshop’s Warp Tool. There’s a couple of different ways to access the Warp Tool. One is to go up to the Edit menu at the top of the screen, choose Transform, and then choose Warp, but here’s a faster way. Press Ctrl+T (Win) / Command+T (Mac) to bring up Photoshop’s Free Transform box and handles around the image, then simply click on the Warp icon in the Options Bar at the top of the screen:

You can click on that icon again at any time to switch back and forth between Free Transform and the Warp Tool.
With the Warp Tool selected, you’ll see a 3×3 grid appear over your image:
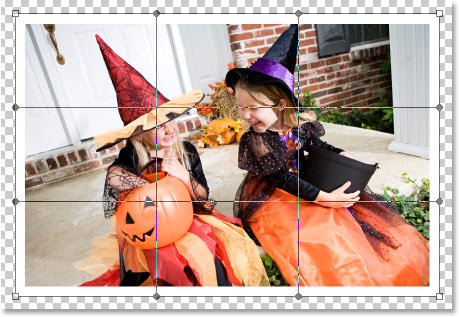
If you’ve never used the Warp Tool before, it may seem a little confusing at first, but the easiest thing to do is simply play around with it and see what it does, since nothing you do will actually be applied to the image as long as the Warp Tool remains active. In no time at all, you’ll see just how easy and fun the tool really is. To warp the image from any of the corners, simply click on any of the square corner handles and drag it around with your mouse. Here I’m dragging the top left corner outward:
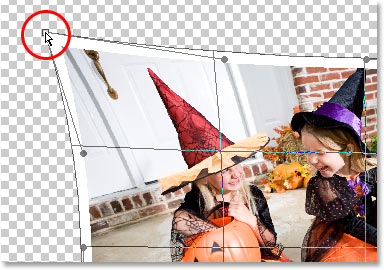
To create a page curl, which is where the Warp Tool really shines, drag any of the corner handles inward. If you drag the corner in far enough, you’ll actually see what looks like the back of the photo appearing in the corner (it’s actually a mirror image of the photo, but it still looks pretty cool):
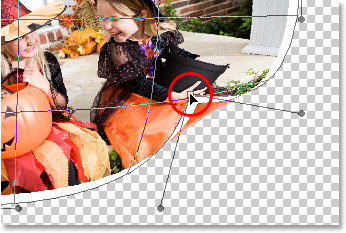
You can also warp the image by dragging the round handles that extend out from the corners:
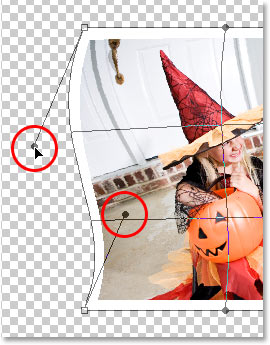
And yet another way to warp the image is by simply clicking anywhere inside of the image and dragging your mouse around to warp it from that spot:
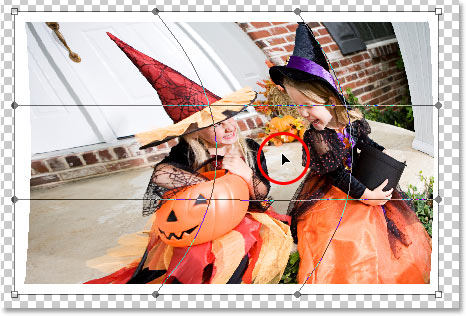
As you can see, Photoshop’s Warp Tool gives us lots of control and flexibility over how we bend and reshape the image, and for this collage effect we’re creating, there’s no right or wrong way to go about it. We’re not trying to create any sort of realistic effect here, although we could if we wanted. All we’re really going for is something that looks fun, so feel free to play around with your image, warping, stretching, bending, twisting, and curling it anyway you like. The only thing you should try to avoid is warping anyone’s face, since they may not be too happy when they see what you’ve done, so try to limit your warp effects to the corners and edges of the photo as much as possible.
Unfortunately, there’s no “undo” with the Warp Tool, so if you’re not happy with what you’ve done and want to try again, you’ll need to press your Esc key to cancel your changes and exit out of the Warp Tool, then go back and start over.
Here’s what my image looks like, with the Warp Tool still active, after I’ve reshaped the image in a way that works for me (yours may look completely different):
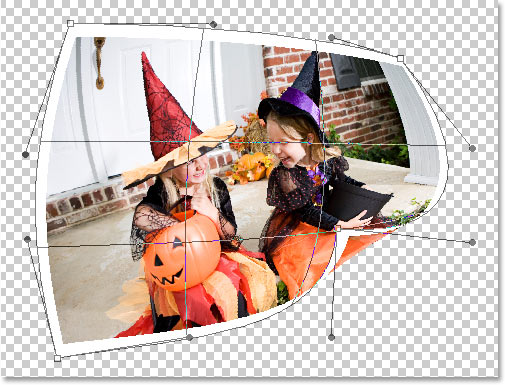
When you’re ready to accept your changes, press Enter (Win) / Return (Mac) to have Photoshop apply them to the image.
Step 7: Duplicate The Layer
Now that we’ve warped the image, we need to duplicate it. To do that, with “Layer 0” (the layer that contains our image) selected in the Layers palette, use the keyboard shortcut Ctrl+J (Win) / Command+J (Mac) to duplicate the layer. If we look in the Layers palette now, we can see the newly created copy of the layer, which Photoshop has named “Layer 0 copy”, above the other two layers:
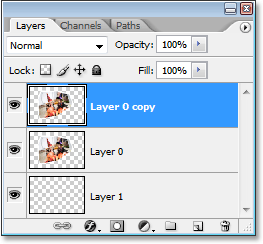
Step 8: Fill The Original Image On “Layer 0” With Black
Click back on “Layer 0” in the Layers palette to select it. Then, press the letter D on your keyboard if needed to reset your Foreground and Background colors so black becomes your Foreground color (white becomes your Background color). You can see your current Foreground and Background colors in the color swatches near the bottom of the Tools palette (the swatch in the top left is the Foreground color and the one in the bottom right is the Background color):
Then, with “Layer 0” selected, use the keyboard shortcut Shift+Alt+Backspace (Win) / Shift+Option+Delete (Mac) to fill the image on the layer with black. You won’t see anything happen in your document window and that’s because the image on “Layer 0 copy” is blocking what we’ve done on “Layer 0” below it from view, but if we look at the preview thumbnail for “Layer 0” in the Layers palette, we can see that the image has in fact been filled with black:
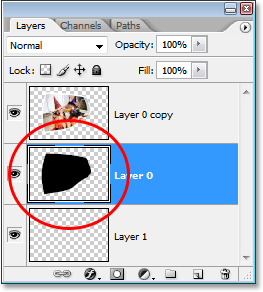
Step 9: Create A Drop Shadow With The Warp Tool
We’re going to use the Warp Tool once again, this time to create a drop shadow effect for our image using the area we just filled with black. With “Layer 0” still selected, I’m going to access the Warp Tool the same way I did before, by pressing Ctrl+T (Win) / Command+T (Mac) to bring up the Free Transform handles and then clicking on the Warp Icon in the Options Bar. I want the light to appear to be coming from the top left, which means my shadow needs to appear along the bottom right of the image. So with my Warp Tool active, I’m going to bend and reshape the black-filled area so it sticks out from under the right and bottom of the image. Again, we’re not going for absolute realism here, so feel free to exaggerate things a little:
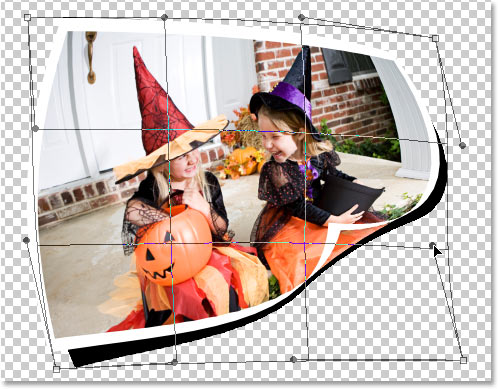
Press Enter (Win) / Return when you’re done to accept and apply the changes.
Step 10: Apply The Gaussian Blur Filter
We need to blur the edges of our shadow a little, so go up to the Filter menu at the top of the screen, choose Blur, and then choose Gaussian Blur. When the Gaussian Blur dialog box appears, I’m going to enter a Radius value of about 6 pixels to blur the edges of my shadow slightly. Again, you may need to enter a higher value if you’re using a high resolution image:
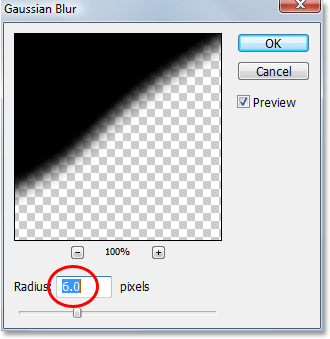
Click OK to exit out of the dialog box when you’re done.
Step 11: Lower The Opacity Of The Layer
We’ve warped our shadow into shape with the Warp Tool and blurred out the edges, but our shadow is much too intense at this point. To fix that, go up to the Opacity option in the top right of the Layers palette and lower the layer’s opacity to around 60%:
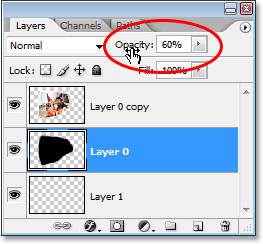
Here’s my image after lowering the opacity of the shadow:
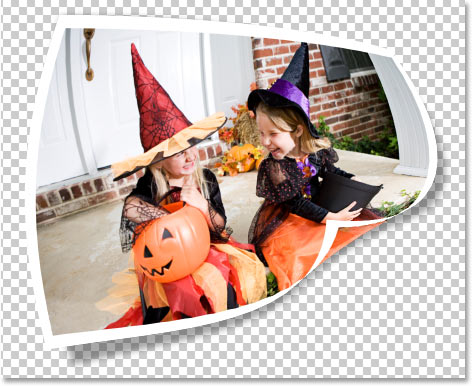
Step 12: Add A New Blank Layer Above The Other Layers
We’re almost done, but let’s finish things off by adding some subtle highlights and shadows to our photo to enhance the illusion that it’s really bending and twisting in 3D space. To do that, we first need to add a new layer above the other layers, so click on the top layer (“Layer 0 copy”) to select it, then click on the New Layer icon at the bottom of the Layers palette to have Photoshop add a new blank layer at the top, which it automatically names “Layer 2”:
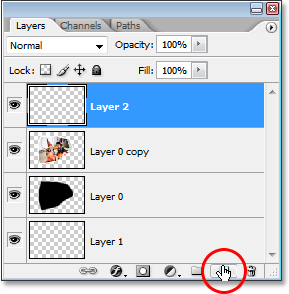
Step 13: Change The Blend Mode Of The New Layer To “Hard Light”
We need to change the blend mode of our new layer. To do that, go up to the Blend Mode options in the top left corner of the Layers palette. By default, the layer is set to the “Normal” blend mode. Click on the down-pointing arrow to the right of the word “Normal” and select Hard Light from the list:
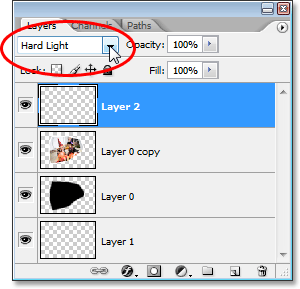
Step 14: Lower The Opacity Of The Layer
We’re going to use this layer to paint in some highlights and shadows with Photoshop’s Brush Tool, but before we do, we need to lower the opacity of this layer quite a bit. We want very subtle highlights and shadows, so go over to the Opacity option in the top right of the Layers palette and lower the opacity all the way down to about 20% to start with. You may need to raise or lower it slightly when you’re done:

Step 15: Load A Selection Around The Image
Before we begin painting, let’s make sure we paint “inside the lines” so-to-speak, so we’re not painting over any of the transparent areas around the image. To do that, hold down your Ctrl (Win) / Command (Mac) key and click directly on the preview thumbnail for “Layer 0 copy” (the layer that contains our image) in the Layers palette:
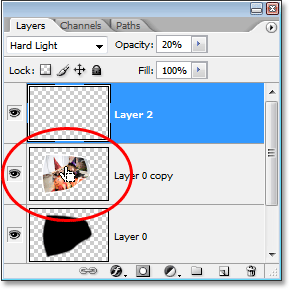
This loads a selection around the image in the document window:
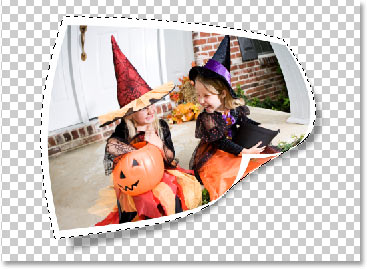
Step 16: Select The Brush Tool
Select Photoshop’s Brush Tool from the Tools palette, or simply press B on your keyboard to select it with the shortcut:
Step 17: Paint With Black To Add Shadows To The Image
With the Brush Tool selected and black as your Foreground color, paint over a few areas in the image to add subtle shadows, giving the image a bit more of a 3D look to it. Resize your brush as needed by pressing the left bracket key on your keyboard to make the brush smaller or the right bracket key to make it larger. To control the hardness of the brush edges, hold down your Shift key and press the left bracket key a few times to soften the edges, or hold down Shift and press the right bracket key a few times to make the brush edges harder.
You can also Right-click (Win) / Control-click (Mac) anywhere inside the document to bring up the Brush Tool dialog box where you can adjust the brush diameter and hardness with slider controls at the top:
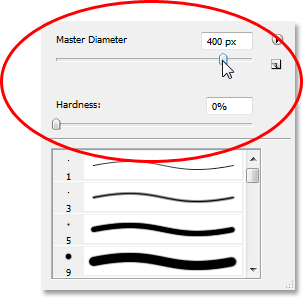
Then simply paint over parts of the image to add some shadows. Thanks to the selection we’ve loaded around the image, we don’t have to worry about accidentally painting in the area outside of the photo. The only area we can paint over is the area inside the selection.
If you make a mistake or you’re just not happy with how you painted over an area, either press Ctrl+Z (Win) / Command+Z (Mac) to undo your last brush stroke, or press E on your keyboard to switch to Photoshop’s Eraser Tool, erase over the mistake, then press B to switch back to your Brush Tool and continue painting. Here’s my image after painting in some shadows in the top left and right corners, as well as over the page curl in the bottom right corner:
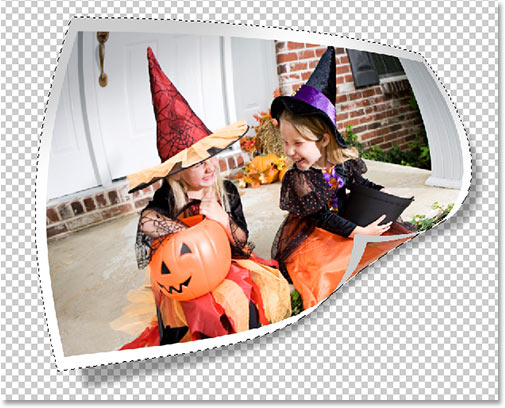
Step 18: Paint With White To Add Highlights To The Image
Once you’re done painting in some shadows, press the letter X on your keyboard to swap your Foreground and Background colors so white becomes your Foreground color.
Then just as you did for the shadows, simply paint over a few areas to add some highlights, changing your brush size and edge hardness as needed.
Here, I’m painting a very subtle white highlight area in the bottom left corner of the image:
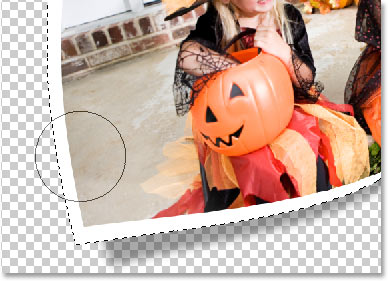
The highlights aren’t as noticeable in my image since I’m painting over an area that is already fairly bright. They may be more noticeable in your image, but even a very subtle highlight still adds to the effect and keeps the image from looking flat.
When you’re done painting your shadows and highlights, press Ctrl+D (Win) / Command+D (Mac) to deselect the selection around the image.
Step 19: Adjust The Layer Opacity If Needed
If you find that your shadows and highlights are a bit too subtle in your image, go back to the Opacity option in the top right corner of the Layers palette and increase the layer opacity until you’re happy with how they look. Or if you think your shadows and highlights are too strong, lower the opacity slightly. Either way, you shouldn’t need to adjust the opacity amount by much, since even small adjustments have a big impact with the layer set to the Hard Light blend mode. I’m going to fine-tune my shadows and highlights by increasing my layer opacity to 22%:
Here’s my image now with my shadows and highlights added:
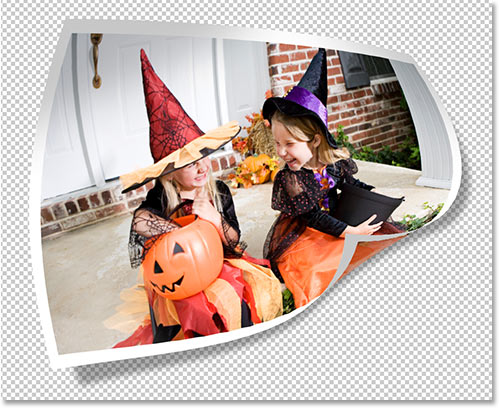
Step 20: Group The Three Layers That Make Up The Image
We’ve completed our work on our first photo! All we need to do now is add it to our main collage document (which we’ll open in a moment). Right now, our image is made up of three separate layers – the main image on “Layer 0 copy”, the main shadow below it on “Layer 0”, and the highlights and shadows on “Layer 2” at the top. Rather than dragging three separate layers into the main collage document, let’s make things easier by grouping the layers so all three of them will be placed inside a “folder” in the Layers palette. That way, we can simply drag the folder over to the collage document instead of dragging three separate layers. This will also make it easier to keep our main collage document organized when we start adding additional photos to it.
To create the layer group, since “Layer 2” is currently selected in the Layers palette, hold down Shift and click on “Layer 0”. This will select both “Layer 0” and “Layer 0 copy” above it while keeping “Layer 2” at the top selected, so all three layer will then be selected (in previous versions of Photoshop, you would need to link the layers together rather than selecting them like this):
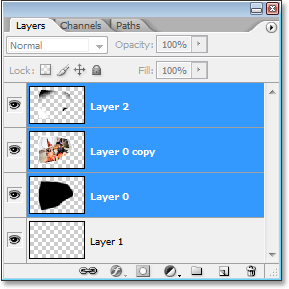
With all three layer selected, either go up to the Layer menu at the top of the screen and select Group Layers or simply use the keyboard shortcut Ctrl+G (Win) / Command+G (Mac). Whichever way you choose, Photoshop adds all three layers into a new group. If you look in your Layers palette, you’ll see that the three layers seem to have disappeared, replaced by a folder icon with the name “Group 1” beside it. Double-click directly on the words “Group 1” and rename the group something more descriptive like “Photo 1”:
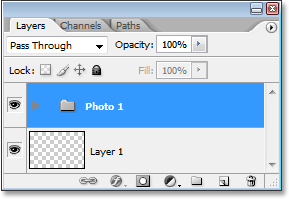
If you look closely, you’ll see a small, right-pointing triangle to the left of the folder icon. Click on it to twirl the folder open, and you’ll see your three layers appear inside of it:
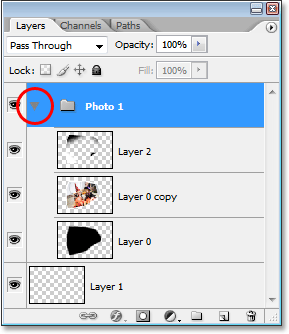
Click on the triangle once again to close group, leaving only the folder visible.
Step 21: Open The Image To Use As Your Collage Background
The work on our first photo is done and we’ve organized the three layers that make up the image into a layer group.
All we need to do now is drag the layer group over to our main collage document, so go ahead and open the image you want to use as your background.
Here’s the image I’ll be using:

Step 22: Drag The Layer Group Into The Main Collage Image
With both images open in their own separate document windows on your screen, click anywhere inside the document containing the photo we just finished working on so that its document window is selected. Then, simply click on the layer group in the Layers palette and drag the group into your background image document:
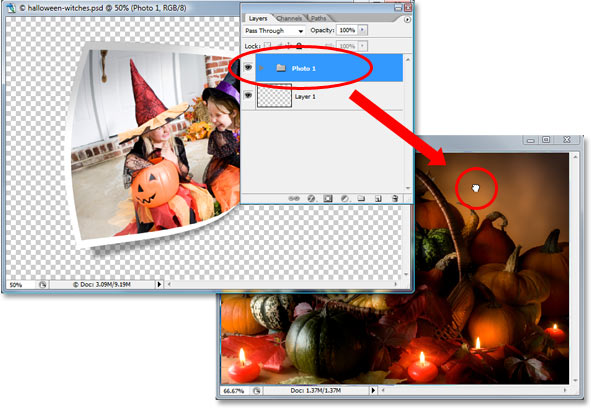
You’ll see your photo appear in front of your background image in the new document, and if you look in the new document’s Layers palette, you’ll see that the layer group has been copied over to the new document and is now sitting above the Background layer:
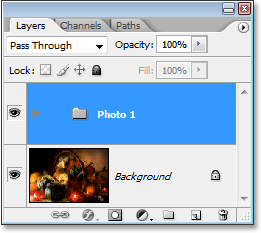
Step 23: Resize And Reposition The Photo With Free Transform
Now that our first photo is in front of the background inside the document we’ll be using for our collage, we can move and resize it as needed. To do that, press Ctrl+T (Win) / Command+T (Mac) to once again bring up the Free Transform box and handles around this image. To move the photo with Free Transform, simply click anywhere inside the photo (except for on the small target icon in the center) and drag the image into position with your mouse. To resize the image, hold down Shift and drag any of the corner handles. Holding down Shift as you drag constrains the the width and height proportions of the image, maintaining its original shape. To resize the image from its center, hold down Alt (Win) / Option (Mac) as you drag (you can hold Shift as well to constrain the proportions and resize from the center at the same time). You can also rotate the image if you want by moving your mouse cursor just outside the Free Transform box and then clicking and dragging your mouse.
Here, I’ve moved my photo into the center of the document and I’m resizing it by dragging the bottom corner handle inward:
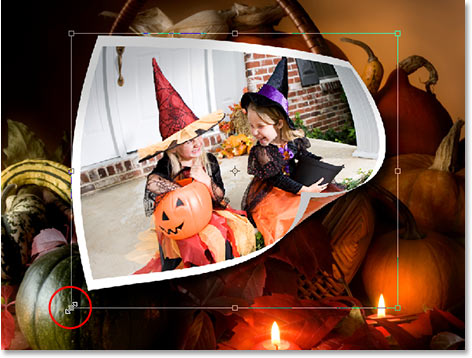
Press Enter (Win) / Return (Mac) to accept your changes when you’re done.
Step 24: Repeat The Same Steps To Add Additional Photos Into The Collage
And with that, our first photo has successfully been warped into shape and added into our collage! To add more photos (it wouldn’t be much of a collage if we didn’t add more photos), simply repeat the steps we’ve just worked through for each additional photo, warping each one differently for variety. When you get to the part where you add the layers into a layer group, name your new groups with successive numbers (“Photo 2”, “Photo 3”, “Photo 4”, etc.), then simply drag them into the main collage document, move them into place and resize them as needed with Free Transform.
I’ve added two more photos to my collage, and if I look in my Layers palette, I can see that I now have three layer groups, named “Photo 1”, “Photo 2” and “Photo 3”, above my Background layer which contains my background image:

If you want to move one photo on top of another in your collage, simply click on its layer group in the Layers palette and drag it above the other photo’s group to change the “stacking order”. Layers and layer groups that are higher in the Layers palette appear in front of layers and groups below them.
Here, after adding my two additional photos, is my final result:
Tags :- Photoshop 8 , Photoshop 7 trick , trick for Photoshop CS6 , photoshop PNG , Png Images , image png , png , transparent images , transparent png , psd , psd image , png free , download png , png for free , png blogspot , png photoshop , photoshop png images , images for photoshop , cs5 trick , photoshop tricks , photoshop tricks , photoshop background , photoshop psd , photoshop cs5, photoshop cs5 trick,
Solar Shifter EX – PC Games | Full Version Torrent Game
Solar Shifter EX – PC Games | Full Version – Downloads Free PC Game

Warp into action with Solar Shifter EX. Man your ship and dive into fierce combat situations in space and over beautiful and distant planet surfaces. Solar Shifter EX is a sci-fi shoot ’em up with the unique ability to ‘shift’.
Your only weapon is your ship: The Phase Shifter has been outfitted with a one-of-a-kind jump drive that lets you warp out of tough situations at will, a technique which will challenge you of to your limits when surviving the masses of enemies coming at you from all sides in this true bullet hell.
In good old shmup fashion you will face uncountable formations of enemies that’ll try to stop you. Be clever and use the Phase Shifter’s jump drive to your advantage or you will get shot.
STORY
Shortly after mankind left the solar system to colonize new worlds, we had to face a powerful alien race. The war has passed, the losses were devastating and the enemy has defeated us. As the final strike, they are about to destroy the sun that gives life to the system that we now call home.
Chaos erupted, and pirate raiders are scavenging fellow human colonies on the outer rim. Their only goal is to collect enough resources to be able to leave the solar system.
FEATURES
• Unique ‘shifting’ mechanic to bring a completely new level of depth into a shmup
• 18 tough missions
• 8 beautiful environments
• Over 40 enemy types encountered throughout the game
• Upgrade your ship
• 4 controllable ships: One main ship and three alien ships. Control all-powerful alien vessels that decimate allied forces with ease.
Tags:- Solar Shifter EX Syndicate Gold Edition Preload, Solar Shifter EX Syndicate Gold Edition Preload torrent, Solar Shifter EX Syndicate Gold Edition Preload download, Solar Shifter EX Syndicate Gold Edition Preload uplay, Solar Shifter EX Syndicate Gold Edition, Solar Shifter EX Syndicate Gold Edition torrent, Solar Shifter EX Syndicate Gold Edition crack, Solar Shifter EX Syndicate Gold Edition preload, Solar Shifter EX Syndicate Gold Edition preload torrent, Solar Shifter EX Syndicate Gold Edition uplay preload, Solar Shifter EX Syndicate Gold Edition unlocker, Solar Shifter EX Syndicate Gold Edition crack only,


- OS: Windows Vista/7/8/10
- Processor: Intel Pentium 4 @ 2.0 GHz / AMD Athlon XP 2200+
- Memory: 2 Gb
- Hard Drive: 4 Gb free
- Video Memory: 256 Mb
- Video Card: nVidia GeForce 8600 / ATI Radeon HD 2600
- Sound Card: DirectX Compatible
- DirectX: 9.0c
- Keyboard
- Mouse
RECOMMENDED:
- OS: Windows Vista/7/8/10
- Processor: Intel Core 2 Duo @ 2.2 GHz / AMD Athlon 64 X2 4600+
- Memory: 3 Gb
- Hard Drive: 4 Gb free
- Video Memory: 512 Mb
- Video Card: nVidia GeForce GTX 275 / AMD Radeon HD 4850
- Sound Card: DirectX Compatible
- DirectX: 9.0c
- Keyboard
- Mouse

| Click On any link n Wait 5 seconds then Skip Ads | ||
| Download Torrent Client | U torrent | |
| Download Server 1 | Download Torrent | |
| Download Server 2 | Download Torrent | |
